1. File 객체로 작업하기
1> File 객체의 정의
* File객체는 하드디스크에 존재하는 실제 파일이나 디렉토리가 아니고 그것에 대한 경로(Pathname) 또는 참조(reFerence)를 추상화한 객체이다. 파일 객체는 새 파일에 대한 경로나 만들고자하는 디렉토리를 캡슐화한 것이다.
2> File 객체의 용도
* 물리적 파일 시스템에 대해 캡슐화한 경로명을 확인하고 실제의 파일이나 디렉토리와 대응되는지 알아볼 때.
* 파일 스트림객체를 생성하고자 할 때.
2. File 객체 생성하기
1>File 객체를 생성하는 데에는 네 개의 생성자를 사용할 수 있다.
* 인자로 String 객체를 전달하는 것.
File mtDir - new File("c:/j2SDK 1.4.0/src/java/io");
File 클래스의 생성자는 인자로 전달된 경로를 확인하지 않는다 .
File 클래스의 생성자로 어떤 문자열을 넘겨도 된다는 것을 알 수 있다.
File 객체는 불변적이므로 객체를 생성하고 나면 그것이 가진 경로를 바꿀 수 없다
* 첫번째 인자로 부모 디렉토리를 가진 File객체 전달, 두번째 인자로 String객체 전달.
부모 디렉토리 - 해당 파일을 가지고 있는 디렉토리.
* 첫번째 인자로 부모 디렉토리의 경로를 String객체로 전달, 두번째 인자로 String객체 전달.
* URL이용.
2>경로에 대한 이식성을 고려
* 경로 이름을 만드는 것은 시스템에 의존적이지만 File 클래스의 separator 변수를 사용함으로써 좀 더 시스템에 독립적으로 myFile에 대한 경로를 지정 가능.
3>절대경로와 상대경로
* 절대 경로 : 접두사(c:\, c://)를 포함하는 경로.
ex) cd c:\java\API 이런 식의 경로 이동을 하는 방법이 절대 경로.
* 상대 경로 : 접두사가 없는 경로.
ex) cd java 이런 식의 경로 이동을 하는 방법이 상대 경로.
4>시스템 속성에 접근하기
* 파일에 대한 상대 경로를 지정하는 것이 시스템 독립적이긴 하지만 현재의 환경에 독립적인 경로를 지정하고자 하는데, 현재 디렉토리 또는 현재 디렉토리의 하위 디렉토리는 데이터 파일을 저장하기에 적합하지 않은 상황도 있을 수 있다. 이런 경우에 시스템 속성에 접근하는 것이 도움이 될 수 있다.
3. File 객체를 확인하고 테스트하기
1> File 객체에 대한 정보를 얻을 수 있는 메서드
getName() - 경로를 제외한 파일의 이름. 즉, 경로의 가장 마지막 부분을 String 객체로 리턴한다.
getPath() - 파일이나 디렉토리 이름을 포함한 File 객체의 경로를 String으로 리턴한다.
isAbsolute() - File 객체가 절대경로를 참조하고 있다면 true, 아니라면 false를 리턴한다.
getParent() - 현재 File 객체가 나태내는 파일 EH는 디렉토리의 부모 디렉토리의 이름을 String으로 리턴한다. 이때 리턴되는 경로는 파일 이름을 포함하지 않은 순수한 경로명이다. 만약 File 객체가 현재 디렉토리에서 단순히 파일 이름만을 사용해서 만들어져 부모 디렉토리가 명시되어 있지 않을 경우에는 null을 리턴한다.
toString() - 현재 File 객체의 String표현을 리턴하며 File 객체가 String 객체로 변환될 필요가 있을 때 자동으로 호출된다.
hashCode() - 현재 File 객체의 해시코드 값을 리턴한다.
equals() - 두 개의 File 객체가 동일한 것인지 비교할 때 사용되는 메소드이다. 인자로 넘겨지는 File 객체가 현재의 객체와 같은 경로를 가지고 있으면 true를 그렇지 않으면 false를 리턴한다.
2> File 객체가 참조하는 파일이나 디렉토리를 테스트하기 위한 메서드
exist() - File 객체가 참조하는 파일 또는 디렉토리가 실제로 존재하면 true를, 그렇지않으면 false를 리턴한다.
isDirectory() - File 객체가 디렉토리를 참조하는 경우 true를, 그렇지 않으면 false를 리턴한다.
isFile() - File 객체가 파일를 참조하는 경우 true를, 그렇지 않으면 false를 리턴한다.
isHidden() - File 객체가 숨김 속성이 있는 파일을 참조하는 경우 true를, 그렇지 않으면 false를 리턴한다.
canRead() - File 객체가 참조하는 파일 또는 디렉토리를 읽을 권한이 있다면 true를, 없다면 false를 리턴한다. 만약 권한이 없는데 읽으려고 시도하면 SecurityException이 발생한다.
canWrite() - File 객체가 참조하는 파일 또는 디렉토리에 쓰기 권한이 있다면 true를, 없다면 false를 리턴한다. 만약 권한이 없는데 읽으려고 시도하면 SecurityException이 발생한다.
getAbsolutePath() - 현재의 File 객체가 참조하는 파일 또는 디렉토리의 절대경로를 리턴한다. 만약 객체가 절대경로를 포함하고 있다면 getPath() 메소드에 의해 리턴되는 것과 동일한 문자열을 리턴할 것이다. 그렇지 않다면 윈도우즈 환경에서는 현재 디렉토리가 나타내는 경로의 드 라이브 이름을 사용하거나 경로에 드라이브 이름이 명시되어 있지 않다면 현재 사용자 디렉토리에 대해서 절대경로가 결정된다. 유닉스 환경에서는 현재 사용자 디렉토리에 대해서 절대 경로가 결정된다.
getAbsoluteFile() - 현재 File 객체가 참조하는 파일 또는 디렉토리의 절대경로를 포함한 File 객체를 리턴한다.
=======================================소스 코드=======================================
import java.io.File;
public class TryFile {
public static void main(String[] args) {
// 디렉토리를 참조하는 객체 생성
File myDir = new File("C:/javaex1");
System.out.println(myDir + (myDir.isDirectory() ? " is" : " is not") + " a directory.");
// 파일을 참조하는 객체 생성
File myFile = new File(myDir, "TryFile3.java");
System.out.println(myFile + (myFile.exists() ? " does" : " does not") + " exist");
System.out.println(myFile + (myFile.isFile() ? " is" : " is not") + " a file.");
System.out.println(myFile + (myFile.isHidden() ? " is" : " is not") + " hidden");
System.out.println("You can" + (myFile.canRead() ? " " : "not ") + "read " + myFile);
System.out.println("You can" + (myFile.canWrite() ? " " : "not ") + "write " + myFile);
return;
}
}
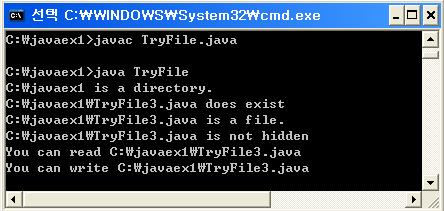
=======================================소스 코드=======================================
3> 존재하는 파일 또는 디렉토리에 대해 더 많은 정보를 제공해주는 메서드
list() - 현재 File 객체가 디렉토리를 나태내고 있다면 디렉토리 내의 파일 이름과 하위 디렉토리의 이름들을 담고 있는 String 배열이 리턴된다. 만일 디렉토리가 비어 있다면 배열도 비어있을 것이다. 또한 File 객체가 파일을 나태내고 있다면 null을 리턴할 것이다. 이 메소드는 허가되지 않은 디렉토리를 접근하려 할 경우 SecurityException을 발생시킨다.
listFiles() - 이 메소드를 호출한 객체가 디렉토리라면, 그 디렉토리 내의 파일과 하위 디렉토리에 대응되는 File 객체 배열이 리턴된다. 빈 디렉토리라면 빈 배열이 리턴될 것이다. 호출된 객체가 디렉토리가 아니거나 입출력 오류가 발생한다면 null을 리턴할 것이다. 이 메소드는 허가되지 않은 디렉토리에 접근하려 할 때 SecurityException을 발생시킨다.
length() - 현재 File 객체가 참조하는 파일의 길이를 바이트 단위로 표현한 long 형의 값을 리턴한다. 현재 File 객체의 경로가 존재하지 않는 파일을 참조하고 있다면 0을 리턴할 것이다. 만약 그 경로가 디렉토리를 참조한다면, 정의되지 않은 값이 리턴된다.
lastModified() - 현재 File 객체가 나타내는 파일 또는 디렉토리가 마지막으로 수정된 시각을 나타내는 long형의 값을 리턴한다. 이때 시각은 그리니치 표준시(GMT)로 1970년 1월 1일 자정 이후로부터 지난 시간을 멀리 초 단위로 계산한 값이다. 파일이 존재하지 않는다면 0을 리턴한다.
=======================================소스 코드=======================================
import java.io.File;
import java.util.Date; // Date 클래스를 사용하기 위해 포함시킴
public class TryFile2 {
public static void main(String[] args) {
// 디렉토리를 참조하는 객체 생성
File myDir = new File("C:/javaex1");
System.out.println(myDir.getAbsolutePath() + (myDir.isDirectory() ? " is " : " is not ") + "a directory");
System.out.println("The parent of " + myDir.getName() + " is " + myDir.getParent());
// 디렉토리 내의 파일 리스트를 얻어옴
File[] contents = myDir.listFiles();
// 파일 리스트를 출력
if (contents != null) {
System.out.println("\nThe " + contents.length + " items in the directory " + myDir.getName() + " are:");
for (int i = 0; i < contents.length; i++) {
System.out.println(contents[i] + " is a " + (contents[i].isDirectory() ? "directory" : "file") + " last modified "
+ new Date(contents[i].lastModified()));
}
} else {
System.out.println(myDir.getName() + " is not a directory");
}
System.exit(0);
}
}
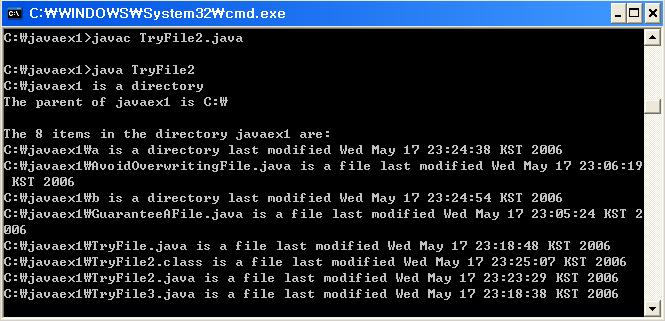
=======================================소스 코드=======================================
4> 파일 리스트 필터링
* list()와 listFiles() 메서드는 파일 리스트를 필터링하는 인자를 받도록 오버로드 되어 있다.
* list() 메서드의 인자는 FilenameFilter 타입의 변수여야 하지만,
* listFiles() 메서드는 FilenameFilter와FileFilter 두 가지를 모두 사용할 수 있다.
4. 파일과 디렉토리를 생성하고 수정하기
File 클래스에는 그 파일을 읽기 전용으로 만들거나 이름을 바꾸는 등 물리적인 파일에 변화를 줄 수 있는 메서드가 있다. 또한 파일 또는 디렉토리를 생성하거나 삭제할 수 있게 해주는 메서드들도 있다.
renameTo(File path) - 현재 객체가 나타내는 파일의 이름이 메소드의 인자로 전달된 File 객체가 나타내는 경로를 변경될 것이다. 이것은 프로그램에서 현재의 File 객체를 변경하는 것이 아니라 물리적인 파일을 실제로 바꾸는 것이라는 점을 주의해야 한다. 따라서 현재 File 객체가 나타내던 파일은이 메소드가 수행되고 나면 새로운 이름을 가지게 되므로 더 이상 존재하지 않을 것이며 다른 디렉토리에 위치하게 될 수도 있다. 새로운 경로에 있는 파일의 디렉토리가 원래의 것과 다르다면 파일은 새로운 디렉토리로 옮겨질 것이다. 만일 새로운 경로가 존재하지 않는 디렉토리이거나 그 곳에 쓰길을 할 수 없다면 이 메소드는 실패할 것이다. 이 메소드는 작업이 성공적으로 이루어지면 true를 리턴하고, 그렇지 않으면 false를 리턴한다.
setReadOnly() - 현재 객체가 나타내는 파일을 읽기 전용으로 설정한다. 성공하면 true를 리턴한다.
mkdir() - 현재의 File 객체에 의해 지정된 경로로 디렉토리를 생성한다. 이 메소는 생성하려는 디렉토리의 부모 디렉토리가 미리 존재하지 않으면 실패할 것이다. 이 메소드는 성공하면 true를 리턴하고, 그렇지 않으면 false를 리턴한다.
mkdirs() - 현재 File 객체가 나타내는 디렉토리를 생성하며, 이때 필요한 모든 부모 디렉토리도 함께 생성한다. 새로운 디렉토리가 성공적으로 생성되었다면 true를 그렇지 않으면 false를 리턴한다. 메소드가 false를 리턴한 경우에도 부모 경로 중 일부가 생성되었을 수도 있다.
createNewFile() - 현재 File 객체로 정의돈 경로에 비어있는 새로운 파일을 생성한다. 파일이 성공적으로 생성되면 true를 리턴한다. 경로에 지정된 디렉토리가 존재하지 않는다면 IOException 예외가 발생하고, 지정된 파일이 이미 존재한다면 실패한다.
createTempFile(String prefix, String suffix, File directory) - 이것은 directory 디렉토리에 처음 두 개의 인자를 사용해서 생성된 이름으로 임시 파일을 생성하는 정적 메소드이고, 생성된 파일에 해당하는 File 객체를 리턴한다. 문자열 prefix는 파일 이름의 앞부분을 나타내며 최소한 세 글자 이상은 되어야 한다. 문자열 suffix는 파일의 확장자를 나타낸다. 파일 이름이 prefix와 다섯자 이상은 생성된 문자, 그리고 확장자로 이루어진다. 만약 suffix가 null이라면 확장자는 .tmp 가 될 것이다. prefix나 suffix가 현재 시스템의 파일 이름으로 쓰기에 너무 길다면 끝 부분을 잘라내고 사용하지만, 세 글자 이하로 잘라내지는 않는다. directory 인자가 null이라면 시스템의 임시 디렉토리가 사용될 것이다. 만일 파일이 생성될 수 없다면 IOEception이 발생하며 prefix가 세글자 이하라면 IllegalArgument Exception이 발생할 것이다.
createTempFile(String prefix, String suffix) - createTempFile(String prefix, String suffix, File directory)와 동일하다.
delete() - 현재 File 객체가 나타내고 있는 파일 또는 디렉토리를 삭제하며 성공적으로 삭제되었다면 true를 리턴한다. 이 메소드는 비어있지 않은 디렉토리는 지우지 않는다. 그러므로 디렉토리를 삭제하려면 디렉토리 내의 모든 파일을 먼저 지워야 한다.
deleteOnExit() - 현재 File 객체가 나타내는 파일 또는 디렉토리가 프로그램이 끝날 때에 삭제 되도록 한다. 이 메소드는 값을 리턴하지 않으며, 삭제는 JVM이 정상적으로 종료될 경우에만 시도된다. 일단 File 객체에 대해서 이 메소드를 호출하면 삭제 작업은 돌이킬 수 없기 때문에 주의해서 사용해야 한다.
5. 파일 출력 스트림 생성하기
디스크에 존재하는 물리적인 파일에 무언가 쓰고자 할 때 FileOutputStream 객체를 사용할 수 있다.
1>FileOutputStream 객체의 다섯 개의 생성자
FileOutputStream(String filename) - filename이라는 이름의 파일에 대한 출력 스트림을 생성한다. 파일에 이미 존재하는 내용을 덮어쓰게 된다. 어떤 이유로든 파일이 열리지 않는다면 FileNotFoundException이 발생한다.
FileOutputStream(String filename, boolean append) - filename이라는 이름의 파일에 대한 출려 스트림을 생성하며, 만약 append인자 값이 true이고 파일 내용이 존재한다면 그 내용 뒤에 덧붙여 쓴다. append인자 값이 false라면 이미 존재하는 파일의 내용을 덮어쓰게 된다. 어떤 이유로든 파일이 열리지 않는다면 FileNotFoundException이 발생한다.
FileOutputStream(File file) - File 객체가 나타내는 파일에 대한 출력스트림을 생성하며, 이미 파일 내용이 존재하면 그 내용을 덮어쓴다. 어떤 이유로든 파일이 열리지 않는다면 FileNotFoundException이 발생한다.
FileOutputStream(File file, boolean append) - File 객체가 나타내는 파일에 대한 출력 스트림을 생성하며, 만약 append 인자 값이 true이고 파일 내용이 이미 존재한다면 그 내용 뒤에 덧붙여 쓴다. 어떤 이유로든 파일이 열리지 않는다면 FileNotFoundException이 발생한다.
FileOutputStream(FileDescriptor desc) - desc와 해당하는 출력 스트림을 생성한다. FileDescriptor 객체는 파일에 대해 이미 존재하고 있는 연결을 참조한다. 그래서 파일이 반드시 존재하므로 이 생성자는 FileNotFoundException이 발생한다.
6. 파일이 존재하는 것을 보장하기
1> 파일이 존재하면 이 파일에 데이터를 덧붙이고 존재하지 않는 파일이면 생성하고자 할 때 파일 출력 스트림을 생성해야하는데, 여기서 확인해야 할 것들이 있다.
2> File 객체를 사용해서 실제로 디렉토리가 아니라 파일을 나타내고 있는지 확인한다. 만일 파일이 아니라면 더 이상 진행하지 말고 오류 메시지를 출력해 주어야 한다.
3> 그 파일이 존재하는지 확인하기 위해 File 객체를 사용한다. 파일이 존재하지 않는다면 File 객체가 절대경로를 가지고 있는지 확인해야 한다. 이것은 부모 디렉토리를 얻어오고 확인하는 데 사용된다.
4> 부모 디렉토리에 대한 경로를 얻어오고 이것을 사용해서 다른 File 객체를 생성한다. 부모 디렉토리가 존재하는지 확인하기 위해 새로운 File 객체를 사용한다. 만약 존재하지 않는다면 File 객체의 mkdir() 메서드를 사용해서 새로 생성한다.
=======================================소스 코드=======================================
import java.io.File;
import java.io.FileOutputStream;
import java.io.FileNotFoundException;
public class GuaranteeAFile {
public static void main(String[] args) {
String filename = "C:/Beg Java Stuff/Bonzo/Beanbag/myFile.txt";
File aFile = new File(filename); //File 객체 생성
//경로가 파일인지를 확인
if (aFile.isDirectory()) {
// 오류 메세지 후에 종료함
// 여기서 키보드로부터 입력을 받아 다시 시도하도록 할 수 있음
System.out.println("The path " + aFile.getPath() + " does not specify a file. Program aborted.");
System.exit(1);
}
// 파일이 존재하지 않을 경우
if (!aFile.isFile()) {
// 부모 디렉토리를 확인
aFile = aFile.getAbsoluteFile();
File parentDir = new File(aFile.getParent());
if (!parentDir.exists()) { // ... and create it if necessary
parentDir.mkdirs();
}
}
// 스트림에 대한 참조를 저장할 장소
FileOutputStream outputFile = null;
try {
// 데이터를 추가하는데 사용될 스트림 생성
outputFile = new FileOutputStream(aFile, true);
} catch (FileNotFoundException e) {
e.printStackTrace(System.err);
}
System.exit(0);
}
}
=======================================소스 코드=======================================
7. 파일 덮어쓰는 것을 방지하기
* 이미 파일이 존재할 때 그 파일을 덮어쓰고 싶을 않을 때 덮어쓰기를 막을 수 있는 방법이 있다. 저장하려는 원래 이름을 어떠한 방법으로든 바꿔준다면 그것이 덮어쓰기를 막을 수 있는 한 가지 방법이 될 수 있다.
=======================================소스 코드=======================================
import java.io.File;
import java.io.FileOutputStream;
import java.io.FileNotFoundException;
public class AvoidOverwritingFile {
public static void main(String[] args) {
String filepath = "C:/Beg Java Stuff/myFile.txt";
File aFile = new File(filepath);
FileOutputStream outputFile = null; // 스트림에 대한 참조를 저장할 장소
if (aFile.isFile()) {
File newFile = aFile; // 원래의 파일을 가지고 시작함
// 유일한 이름이 될 때까지 파일 이름에 "_old"를 덧붙임
do {
String name = newFile.getName(); // 파일의 이름을 얻어옴
int period = name.indexOf('.'); // 확장자의 구분자를 찾음
newFile = new File(newFile.getParent(), name.substring(0, period) + "_old" + name.substring(period));
} while (newFile.exists()); // 이름이 바뀔 때까지 반복
aFile.renameTo(newFile);
}
// 새로운 파일 생성
try {
// 데이터를 추가하기 위한 스트림 생성
outputFile = new FileOutputStream(aFile);
System.out.println("myFile.txt output stream created");
} catch (FileNotFoundException e) {
e.printStackTrace(System.err);
}
System.exit(0);
}
}

=======================================소스 코드=======================================
8. FileDescriptor 객체
1> FileDescriptor 객체
* FileOutputStream에는 FileDescriptor 타입의 객체를 리턴해주는 getFD() 메서드가 있다.
* 여기서 FileDescriptor는 물리적인 파일에 대한 현재의 연결을 나타내는 객체이다.
* 직접 FileDescriptor 객체를 생성할 수는 없고 파일 스트림을 나타내는 객체로부터 getFD() 메서드를 호출해서 FileDescriptor 객체를 얻을 수 있다
* 스트림을 한번 닫고 나면 파일에 대한 연결이 끊어지므로 더 이상 FileDescriptor 객체를 얻을 수 없다
2> FileDescriptor 객체 사용
* 표준 스트림에 대응되는 바이트나 문자 스트림을 만들고자 할 때 편리하게 사용할 수 있다


