http://www.okjsp.pe.kr/seq/136284

struts 2는 콘트롤러, 디스패쳐, 발리데이션용으로 사용하시고, 
spring은 DI콘테이너, AOP로 사용하시고, 
iBatis는 ORM프레임워크로 사용하시면 되겠네요. 

팁으로, 
Tiles 2.0 는 레이아웃템플레이트 
Acegi는 표준세큐리티프레임워크 
Google Web Toolkit는 리치클라이언트 
JUnit4는 테스트프레임워크 
JMockit는 단위테스트용 Mock프레임워크로 하시면, 

'오픈소스 full stack frame work', 즉 UI,DB, 세큐리티등의 기본적인 문제영역에 대한 
All in one환경을 구축하게 되어, 프레임워크간의 상성에 대해 걱정할 필요없이, 
비지니스로직에 집중가능합니다. 

사용하시면 기존 개발방식보다 훨 쉽게 프로그래밍이 되지 않을까 싶네요.


http://struts.apache.org/2.0.11/index.html 
http://www.springframework.org/ 
http://tiles.apache.org/ 
http://www.acegisecurity.org/ 
http://ibatis.apache.org/ 
http://code.google.com/intl/kr/webtoolkit/ 
http://www.junit.org/ 
https://jmockit.dev.java.net/


 (펌)


http://struts.apache.org/2.x/docs/comparing-struts-1-and-2.html (원본)


Expression Language

Struts 1은 JSTL을 통합한다. 따라서 JSTL EL을 사용한다. EL은 기본 객체 graph traversal을 가지고 있다.그러나, 상대적으로 약한 집합 그리고 index화된 property를 제공한다. 

Struts 2는 JSTL과 사용 할수있다.그러나, Framework은 또한 더 막강하고 유연한 표현 언어인 Object Graph Notation Language(OGNL)이라 불리는 언어를 제공한다.

Binding values into views

Struts 1 접근을 위해 page context안에 객체를 bing하기 위해 표준 JSP 메커니즘을 사용한다.

Struts 2는 ValueStack 기술이 사용된다. 그래서 , taglib은 객체 type을 rendering하기 위해 view에 coupling 없이 접근한다. ValueStack 정책은 같은 이름의 property 이름 이면서 다른 property type들에 대해서 type들의 범위에 교차하여 view의 재사용을 허용한다.

Type Conversion

Struts 1 ActionForm property는 일반적으로 모두 String이다. Struts 1 은 형변환을 위해서 Common-Beanutil들을 사용한다. 변환기는 클래스 마다 하지 instance마다 설정하는 것은 아니다.


Struts 2는 형변환을 위해서 OGNL 을 사용한다. Framework은  지초적이고 일반적인 객체 타입와 원시적인 객체타입을 위해 변환기를 포함한다.

Validation

Struts 1은 manual validation을  ActionForm의 validate 함수 또는 Commons Validator를 확장을 통하여  통해  제공한다. Class들은 동일한 class내에서  다른 validation context를 가지고 있다. 그러나, sub-object들 상에서 validation을  chain할 수는 없다.


Struts 2 는 validation method와 XWork Validation Framework을 통하여 manual validation을 제공한다. XWork Validation Framework은 sub-property에 property Class type과 validation context를 위한 validation정의된 chaining validation을 제공한다.

Control Of Action Execution

Struts 1 은 각각의 모듈을 위해  분할된 Request Processor( 생명주기 )을  제공하나, 모듈 안의 모든 Action 들은 반드시 같은 생명주기를 공유해야 한다.

Struts 2 는 기본적인interceptor Stack을 통해 Action마다 다른 생명주기를 생성할 수 있도록 제공한다. stack은 필요한 곳에 생성하거나 다른 action들과 사용되도록 Custom할 수 있다.


http://raberto.tistory.com/entry/Struts1-and-2 (번역)


출처 : http://jedison.tistory.com/69


본 튜토리얼은 제가 Struts 2를 공부할 목적으로 아래의 원문에 링크된 문서를 번역하여 정리한 것입니다.
원문: http://www.roseindia.net/struts/struts2/Struts2vsStruts1.shtml


이섹션에서 두개의 프레임워크 사이의 다양한 특징을 비교할 예정이다. 스트럿츠 2.x는 스트럿츠 1.x와 비교하여 매우 단순하다. 스트럿츠 2.x의 엑설런트한 특징 몇가지가 아래와 같다.

1. 서블릿 의존
스트럿츠 1의 액션은 하나의 액션이 invoked될 때 HttpServletRequest과 HttpServletResponse 객체가 execute 메서드를 통과하기 때문에 서블릿 API에 의존성을 가지고 있다. 그러나 스트럿츠 2의 경우에 액션은 컨테이너에 의존적이지 않다. 왜냐하면 액션이 단순한 POJO이기 때문이다. 스트럿츠 2에서 서블릿 컨텍스트는 고립되어 테스트된 액션을 허락하는 단순한 맵으로서 표현됩니다. 필요하다면 스트럿츠 2 액션은 진짜 request와 response에 접근할 수 있습니다. 그러나 다른 아키텍쳐 요소들이 HttpServletRequest나 HttpServletResponse에 직접적으로 접근할 필요를 줄어거나 제거했습니다.

2. Action 클래스들
인 터페이스 기반이 아닌 추상클래스 기반으로 개발된 스트럿츠1의 디자인 관련 이슈들은 스트럿츠2에서 해결이 되었습니다. 스트럿츠1의 Action 클래스들은 프레임웍에 의존적인 기반 추상클래스를 상속받도록 되어 있었지만 스트럿츠2의 Action클래스들은 옵셔널하고 커스텀한 서비스를 적용하기 위해 인터페이스를 구현할 수도 있고 아예 하지 않을 수도 있습니다. 스트럿츠2의 경우 Action 클래스들은 단순 POJO들로 개발되기 때문에 컨테이너에 대한 종속관계가 없습니다. 스트럿츠2는 ActionSupport 클래스를 제공하여 공통적으로 사용되는 인터이스들을 구현할 수 있도록 지원합니다.  그럼에도 불구하고 Action 클래스가 어떤 인터페이스를 구현하도록 요구되지는 않습니다. 어떤 POJO 오브젝트라도 execute 메소드만 존재한다면 스트럿츠2에서 Action 오브젝트로 사용이 가능합니다.

3. 검증
스트럿츠 1과 스트럿츠 2 모두 검증 메서드를 통한 수동 검증을 지원합니다.
스트럿츠 1은 검증 메서드를 액션 폼에서 사용하거나 확장시킨 Commons Validator를 통하여 검증합니다.
그러나, 스트럿츠2 는 검증메서드와 XWork 검증 프레임워크를 통하여 수동 검증을 지원한다. XWork Validation 프레임워크는 프라퍼티 클래스 타입과 validation 컨텍스트를 위해 정의된 valadations를 사용하여 서브 프라퍼티까지 연결된 검증을 지원한다.

4.쓰레딩 모델
스트럿츠1에서, 액션 리소스들은 thread-safe하거나 synchronized 되어야만 한다. 그래서 액션들은 singletons이고 thread-safe 이다. 그 액션을 위한 모든 리퀘스트를 처리하기 위한 단 하나의 인스턴스만 존재해야 한다.
싱글톤 전략은 스트럿츠 1 액션에서 할 수 있는 것에 대한 제한을 두게 되었고 개발을 하기 위해 주의가 요구된다. 그러나스트럿츠 2에서, 액션 객체는 각각의 리퀘스트에 대해 초기화된다, 그래서 thread-safety 이슈가 없다. (사실, 서블릿 컨테이너들은 각각의 리퀘스트에 대해 버리는 객체를 많이 생성한다, 그리고 하나 이상의 객체는 실행 패널티를 부과하지 않거나 garbage collection에 영향을 주지 않는다.)


5.테스트용이
스트럿츠 1 어플리케이션의 테스트는 조금 복잡하다. 스트럿츠1 액션들을 테스트하기 위한 주요 장애물은 실행 메소드이다. 왜나하면 그것은 서블릿 API를 나타내기 때문이다. 써드파티 확장인 Struts TestCase는 스트럿츠 1을 위한 mock object 집합을 제공한다. 그러나 스트럿츠 2 액션들은 액션을 초기화하고, 프라퍼티를 세팅하고 메소드들을 invoke 함으로써 테스트될 수 있다. Dependency Injection 지원은 또한 테스팅을 보다 쉽게 만든다. 스트럿츠 2의 액션은 간단한 POJO들이고 프레임웍에 독립적이다. 그러므로 스트럿츠2에서의 테스트는 매우 쉽다.

6.입력값 수집
스트럿츠 1은 입력값을 받기 위해서 ActionForm 객체를 사용합니다. 그리고 모든 ActionForm들은 프레임워크에 종속적인 기본 클래스를 확장하는 것이 필요하다. 자바빈즈는 ActionForm으로 사용될 수 없다. 그래서 개발자들은 입력값을 받기 위해 불필요한 클래스들을 생성해야만 한다.
그러나 스트럿츠 2는 Action 프라퍼티(근원적인 프레임워크에 독립적인 입력 프라퍼티)를 사용은 추가적인 입력 객체의 필요성을 제거했다. 그러므로 불필요성을 감소시켰다. 스트럿츠 2에서는 추가적으로, Action 프라퍼티들은 tag라이브러리들을 통해서 웹 페이지로부터 엑세스될 수있다. 스트럿츠 2는 또한 POJO 폼 뿐만아니라 POJO Action 을 지원하며 ActionForm 패턴도 지원한다. 심지어는 비즈니스나 도메인 객체를 포함한 풍부한 객체 타입을 입/출력 객체로서 사용할 수 있다.

7.표현언어
스트러츠1은 JSTL과 통합되어 있습니다. 그리고 JSTL-EL을 사용한다. 스트럿츠 1 EL은 기본 객체를 가집니다. 그러나 상대적으로 컬렉션과 인덱스된 프라퍼티의 지원은 약하다. 스트럿츠 2도 또한 JSTL을 사용한다. 그러나 Object Graphic Notation Language(OGNL)라고 불리우는 보다 강력하고 유연한 표현언어를 지원한다.

8.뷰와 값의 연결
뷰의 영역에서, 스트럿츠 1은 접근하기 위한 페이지 컨텍스트에서 객체(모델 영역에서 진행된) 를 바인드하기 위해 표준 JSP 메카니즘을 사용한다. 그러나 스트럿츠 2는 "ValueStack"이라는 기술을 사용한다. 태그라이브러리는 view와 그것을 렌더링할 객체 타입을 연결해 놓지 않고서 값에 접근할 수 있습니다. ValueStack 전략은 같은 프라퍼티 이름을 가졌지만 타입은 다른 타입의 범위를 넘나들며 view의 재사용을 허가합니다.

9.형변환
보통, 스트럿츠 1 Actionform 프라퍼티는 모두 String입니다. 스트럿츠1은 형변환시에 Commons-Beanutils를 사용한다.  이 타입 변환기들은 클래스당이며 인스턴스 당으로 설정되지 않는다. 그러나 스트럿츠 2는 형변환시에 OGNL을 사용한다. 프레임워크는 기본적이고 공통적인 객체타입과 프리머티브의 변환기를 포함한다.

10.Action 실행제어
스트럿츠1은 각각의 모듈에 대한 Request Processr를 분리합니다. 그러나 한개의 모듈안에서 모든 액션은 같은 라이프 사이클을 공유해야합니다. 그러나 스트럿츠 2는 Interceptor Stacks을 통해 생성된 각각의 액션에 대해 다른 라이프 사이클의 생성을 지원합니다. 사용자 스택이 생성될 수 있으며 필요하다면 다른 액션을 사용할 있습니다.

'프로그래밍 > Framework' 카테고리의 다른 글

[strust2] Chain Result  (0) 2010.12.14
[spring] struts 2 와 spring 과의 비교  (0) 2010.10.27
[struts2] <s:if> 사용법2  (0) 2010.08.04
[struts2] Workflow interceptor  (0) 2010.03.02
[Strust2] 가이드 문서, 레퍼런스 문서  (0) 2009.07.30
java에서 replaceAll 함수를 이용하여 문자열 내의 태그 제거하기

    /**
     * 주어진 문자열에서 태그를 모두 제거한다.
     * @param str 원본 문자열
     * @param replacement 대체할 문자열
     * @return
     */
    public static String replaceTag(String str, String replacement) {

        // <로 시작. /가 0번 또는 1번 나옴. (a-zA-Z문자가 0번 이상)이 한 묶음.
        // (\s 공백문자. a-Z문자가 0번 이상. = 나옴. > 제외한 문자 0번 이상.)이 한 묶음으로 0번 또는 1번 나옴. <- 태그 다음 공백부터 > 전까지. ==> 속성
        // 공백 0번 이상. /가 0번 또는 1번. >로 끝.
        // ex) <a href="www.naver.com" title="title" >NAVER</a>
        return str.replaceAll("<(/)?([a-zA-Z]*)(\\s[a-zA-Z]*=[^>]*)?(\\s)*(/)?>", replacement);
    }

    /**
     * 주어진 문자열에서 a 태그를 제외한 태그를 모두 제거한다.
     * @param str 원본 문자열
     * @param replacement 대체할 문자열
     * @return
     */
    public static String replaceTagExceptA(String str, String replacement) {

        // /aA 또는 aA가 아닌 것으로 시작하는 모든 태그
        return str.replaceAll("<(?!(/[aA])|([aA])).([a-zA-Z]*)(\\s[a-zA-Z]*=[^>]*)?(\\s)*(/)?>", replacement);
    }

?! 사용해야 하는 걸 알아내느라 애먹었다.
참고: http://nosyu.pe.kr/1139

(?<=.....) : 긍정형 룩비하인드 - 하위 표현식(..... 부분)이 왼쪽에 매치될 때
(?<!.....) : 부정형 룩비하인드 - 하위 표현식(..... 부분)이 왼쪽에 매치되지 않을 때
(?=.....) : 긍정형 룩어헤드 - 하위 표현식(..... 부분)이 오른쪽에 매치될 때
(?!.....) : 부정형 룩어헤드 - 하위 표현식(..... 부분)이 오른쪽에 매치되지 않을 때

(?!(/[aA])|([aA])). 에서와 같이 /a /A 또는 a A 와 매치하지 않는 것을 찾아내는 정규표현식임.

[ftp] FTP/SFTP/FTPS 의 차이점

프로그래밍/Library 2010. 10. 18. 17:27 Posted by galad
셋 다 다르다!!!

FTP – should be only used for the plain old FTP protocol.

      - 일반적으로 우리가 아는 FTP


SFTP – should be only used for SFTP, the SSH file transfer protocol. However, people often shorten Secure FTP into SFTP - this is not correct, because the S in SFTP does not stand for Secure, but for SSH.

      FTP 프로토콜이 아님!!! 정식명칭은 SSH File Transfer Protocol. 약자로 SFTP로 불림.


Secure FTP – this name is the most confusing, because it is used to refer to either of the two different protocols. Whenever this name is used, it is necessary to specify whether the SSH-based or SSL-based file transfer protocol is meant.

      - FTPS, FTP-Secure 등으로 불림. Plain FTP over TLS/SSL channel. FTP 인데 TLS/SSL 을 거쳐서 안전하게 된 것. 


참고: http://www.zehon.com/index.html

http://en.wikipedia.org/wiki/FTPS

'프로그래밍 > Library' 카테고리의 다른 글

[ETC] 네이버에서 오른쪽 클릭 방지 풀기  (0) 2010.11.29
[정규표현식] 태그 제거하기  (0) 2010.10.19
[eclipse] plug-ins  (0) 2010.08.17
[browser] MS Expension Web SuperView  (0) 2010.04.08
[program] 프로파일러  (0) 2009.12.03
상용 작업 중에 다음과 같은 예외가 발생.

javax.net.ssl.SSLHandshakeException: sun.security.validator.ValidatorException: PKIX path building failed: sun.security.provider.certpath.SunCertPathBuilderException: unable to find valid certification path to requested target
        at com.sun.net.ssl.internal.ssl.Alerts.getSSLException(Alerts.java:150)
        at com.sun.net.ssl.internal.ssl.SSLSocketImpl.fatal(SSLSocketImpl.java:1584)
        at com.sun.net.ssl.internal.ssl.Handshaker.fatalSE(Handshaker.java:174)
        at com.sun.net.ssl.internal.ssl.Handshaker.fatalSE(Handshaker.java:168)
        at com.sun.net.ssl.internal.ssl.ClientHandshaker.serverCertificate(ClientHandshaker.java:848)
        at com.sun.net.ssl.internal.ssl.ClientHandshaker.processMessage(ClientHandshaker.java:106)
        at com.sun.net.ssl.internal.ssl.Handshaker.processLoop(Handshaker.java:495)
        at com.sun.net.ssl.internal.ssl.Handshaker.process_record(Handshaker.java:433)
        at com.sun.net.ssl.internal.ssl.SSLSocketImpl.readRecord(SSLSocketImpl.java:877)
        at com.sun.net.ssl.internal.ssl.SSLSocketImpl.performInitialHandshake(SSLSocketImpl.java:1089)
        at com.sun.net.ssl.internal.ssl.SSLSocketImpl.startHandshake(SSLSocketImpl.java:1116)
        at com.sun.net.ssl.internal.ssl.SSLSocketImpl.startHandshake(SSLSocketImpl.java:1100)
        at sun.net.www.protocol.https.HttpsClient.afterConnect(HttpsClient.java:402)
        at sun.net.www.protocol.https.AbstractDelegateHttpsURLConnection.connect(AbstractDelegateHttpsURLConnection.java:170)
        at sun.net.www.protocol.http.HttpURLConnection.getOutputStream(HttpURLConnection.java:857)
        at sun.net.www.protocol.https.HttpsURLConnectionImpl.getOutputStream(HttpsURLConnectionImpl.java:230)
        at com.omp.commons.utils.HTTPUtil.getStringContentHttps(HTTPUtil.java:281)
        at com.omp.commons.utils.HTTPUtil.getContentHttps(HTTPUtil.java:220)
        at com.omp.commons.idp.IDPManager.sendHttps(IDPManager.java:1100)
        at com.omp.commons.idp.IDPManager.sendIDPHttps(IDPManager.java:1048)
        at com.omp.commons.idp.IDPManager.searchUserCommonInfo(IDPManager.java:600)
        at com.omp.commons.idp.IDPManager.searchUserCommonInfoByUserKey(IDPManager.java:554)
        at com.omp.bp.cms.member.action.IDPResponseAction.idpProfile(IDPResponseAction.java:765)
        at sun.reflect.NativeMethodAccessorImpl.invoke0(Native Method)
        at sun.reflect.NativeMethodAccessorImpl.invoke(NativeMethodAccessorImpl.java:39)
        at sun.reflect.DelegatingMethodAccessorImpl.invoke(DelegatingMethodAccessorImpl.java:25)
        at java.lang.reflect.Method.invoke(Method.java:585)
        at com.opensymphony.xwork2.DefaultActionInvocation.invokeAction(DefaultActionInvocation.java:440)
        at com.opensymphony.xwork2.DefaultActionInvocation.invokeActionOnly(DefaultActionInvocation.java:279)
        at com.opensymphony.xwork2.DefaultActionInvocation.invoke(DefaultActionInvocation.java:242)
        at com.opensymphony.xwork2.interceptor.DefaultWorkflowInterceptor.doIntercept(DefaultWorkflowInterceptor.java:163)
        at com.opensymphony.xwork2.interceptor.MethodFilterInterceptor.intercept(MethodFilterInterceptor.java:87)
        at com.opensymphony.xwork2.DefaultActionInvocation.invoke(DefaultActionInvocation.java:236)
        at com.opensymphony.xwork2.validator.ValidationInterceptor.doIntercept(ValidationInterceptor.java:249)
        at org.apache.struts2.interceptor.validation.AnnotationValidationInterceptor.doIntercept(AnnotationValidationInterceptor.java:68)
        at com.opensymphony.xwork2.interceptor.MethodFilterInterceptor.intercept(MethodFilterInterceptor.java:87)
        at com.opensymphony.xwork2.DefaultActionInvocation.invoke(DefaultActionInvocation.java:236)
        at com.opensymphony.xwork2.interceptor.ConversionErrorInterceptor.intercept(ConversionErrorInterceptor.java:122)
        at com.opensymphony.xwork2.DefaultActionInvocation.invoke(DefaultActionInvocation.java:236)
        at com.opensymphony.xwork2.interceptor.ParametersInterceptor.doIntercept(ParametersInterceptor.java:195)
        at com.opensymphony.xwork2.interceptor.MethodFilterInterceptor.intercept(MethodFilterInterceptor.java:87)
        at com.opensymphony.xwork2.DefaultActionInvocation.invoke(DefaultActionInvocation.java:236)
        at com.opensymphony.xwork2.interceptor.StaticParametersInterceptor.intercept(StaticParametersInterceptor.java:148)
        at com.opensymphony.xwork2.DefaultActionInvocation.invoke(DefaultActionInvocation.java:236)
        at org.apache.struts2.interceptor.CheckboxInterceptor.intercept(CheckboxInterceptor.java:93)
        at com.opensymphony.xwork2.DefaultActionInvocation.invoke(DefaultActionInvocation.java:236)
        at org.apache.struts2.interceptor.FileUploadInterceptor.intercept(FileUploadInterceptor.java:235)
        at com.opensymphony.xwork2.DefaultActionInvocation.invoke(DefaultActionInvocation.java:236)
        at org.apache.struts2.interceptor.debugging.DebuggingInterceptor.intercept(DebuggingInterceptor.java:267)
        at com.opensymphony.xwork2.DefaultActionInvocation.invoke(DefaultActionInvocation.java:236)
        at com.opensymphony.xwork2.interceptor.ChainingInterceptor.intercept(ChainingInterceptor.java:126)
        at com.opensymphony.xwork2.DefaultActionInvocation.invoke(DefaultActionInvocation.java:236)
        at com.opensymphony.xwork2.interceptor.I18nInterceptor.intercept(I18nInterceptor.java:148)
        at com.opensymphony.xwork2.DefaultActionInvocation.invoke(DefaultActionInvocation.java:236)
        at com.opensymphony.xwork2.interceptor.ModelDrivenInterceptor.intercept(ModelDrivenInterceptor.java:89)
        at com.opensymphony.xwork2.DefaultActionInvocation.invoke(DefaultActionInvocation.java:236)
        at com.opensymphony.xwork2.interceptor.PrepareInterceptor.doIntercept(PrepareInterceptor.java:138)
        at com.opensymphony.xwork2.interceptor.MethodFilterInterceptor.intercept(MethodFilterInterceptor.java:87)
        at com.opensymphony.xwork2.DefaultActionInvocation.invoke(DefaultActionInvocation.java:236)
        at org.apache.struts2.interceptor.ServletConfigInterceptor.intercept(ServletConfigInterceptor.java:164)
        at com.opensymphony.xwork2.DefaultActionInvocation.invoke(DefaultActionInvocation.java:236)
        at com.opensymphony.xwork2.interceptor.AliasInterceptor.intercept(AliasInterceptor.java:128)
        at com.opensymphony.xwork2.DefaultActionInvocation.invoke(DefaultActionInvocation.java:236)
        at com.opensymphony.xwork2.interceptor.ExceptionMappingInterceptor.intercept(ExceptionMappingInterceptor.java:176)
        at com.opensymphony.xwork2.DefaultActionInvocation.invoke(DefaultActionInvocation.java:236)
        at org.apache.struts2.impl.StrutsActionProxy.execute(StrutsActionProxy.java:52)
        at org.apache.struts2.dispatcher.Dispatcher.serviceAction(Dispatcher.java:468)
        at org.apache.struts2.dispatcher.FilterDispatcher.doFilter(FilterDispatcher.java:395)
        at org.apache.catalina.core.ApplicationFilterChain.internalDoFilter(ApplicationFilterChain.java:215)
        at org.apache.catalina.core.ApplicationFilterChain.doFilter(ApplicationFilterChain.java:188)
        at org.apache.catalina.core.StandardWrapperValve.invoke(StandardWrapperValve.java:213)
        at org.apache.catalina.core.StandardContextValve.invoke(StandardContextValve.java:172)
        at org.apache.catalina.core.StandardHostValve.invoke(StandardHostValve.java:127)
        at org.apache.catalina.valves.ErrorReportValve.invoke(ErrorReportValve.java:117)
        at org.apache.catalina.core.StandardEngineValve.invoke(StandardEngineValve.java:108)
        at org.apache.catalina.connector.CoyoteAdapter.service(CoyoteAdapter.java:174)
        at org.apache.coyote.ajp.AjpAprProcessor.process(AjpAprProcessor.java:444)
        at org.apache.coyote.ajp.AjpAprProtocol$AjpConnectionHandler.process(AjpAprProtocol.java:472)
        at org.apache.tomcat.util.net.AprEndpoint$Worker.run(AprEndpoint.java:1286)
        at java.lang.Thread.run(Thread.java:595)

SSL 통신 중 발생했는데, 여기저기 물어보니 인증서가 없어서 발생한 것이라고.
redirect가 아닌, java에서 response 직접 받는 형태에서 예외가 발생했음.

/usr/java/jdk1.5.0_17/jre/lib/security/ 에 jssecacerts 가 있어야 한다고...

'프로그래밍 > Server' 카테고리의 다른 글

[unix] ftp 사용법  (0) 2010.04.21
[unix] find 명령어 사용하기  (0) 2010.02.08
[Makefile] Makefile 소개(An Introduction to Makefiles)  (0) 2009.10.23
[Shell Script] Shell Script 문법  (0) 2009.10.14
[Shell Script] PATH추가  (0) 2009.10.14

http://applejara.tistory.com/entry/%EC%97%90%EB%9F%ACThe-processing-instruction-target-matching-xXmMlL-is-not-allowed

위 링크의 내용을 참고했습니다.
아래는 자료 보존용입니다.


심각: Parse Fatal Error at line 10 column 6: The processing instruction target m
atching "[xX][mM][lL]" is not allowed.

org.xml.sax.SAXParseException: The processing instruction target matching "[xX][
mM][lL]" is not allowed.


이런 에러를 발생했습니다.
이것은  아래처럼 xml을 선언해 주실때


1. 공백(whitespace) 있거나

   <?xml version='1.0' encoding='utf-8'?>

2. 주석이 있거나

<!-- xml 시작 -->
<?xml version='1.0' encoding='utf-8'?> 
하면 생기는 오류입니다.


xml의 선언부는 항상 문서의 제일 먼저 와야 합니다.

[zip] 압축하기3

프로그래밍/Java 2010. 10. 11. 16:39 Posted by galad
        // 압축 처리
        // 압축대상 폴더명을 압축에서 제외.
        // dirPath = /data/drm
        // zipPath = /data/drm/book
        // 압축 푼 디렉토리 = /data/drm/book
        // book 디렉토리를 대상으로 압축 시, 기본적으로는 book 디렉토리가 포함되어 압축되나
        // sourcePath를 한 depth 안쪽, 즉 zipPath로 지정하면 book 디렉토리를 제외한 상태로 압축된다.
        // (압축 시 압축대상 파일의 절대경로 - sourcePath의 경로)로 파일명 처리하므로, sourcePath를 조정하면 압축대상 디렉토리 제외 가능
        // 기존 압축파일 = book/내에 모든 파일. zipPath를 sourcePath로 하는 압축파일 = /모든 파일
//     zipEntry(dirPath, sourceFile, dirPath, zfileNm);
        zipEntry(zipPath, sourceFile, dirPath, zfileNm);


    /**
     * 압축 대상 파일이나 폴더를 압축 파일에 추가하여 압축한다.
     * 만일 넘겨 받은 파일이 폴더라면 하위 디렉토리 압축을 위해 재귀함수 호출로 처리한다.
     * @param sourcePath 압축할 디렉토리 또는 파일이 위치한 경로. 즉 압축대상의 부모의 경로 / 예) D:\APIs\
     * @param sourceFile 압축할 디렉토리명 또는 이름 / 예) D:\APIs\ 내의 압축대상 j2sdk-1_4_2-doc
     * @param targetDir 압축한 zip 파일을 위치시킬 디렉토리 경로와 이름 / 예) D:\APIs
     * @param zipOutputStream Zip출력스트림 - 압축할 zip 파일에 대한 zip출력스트림. / 예) D:\APIs\zipModuleTest.zip
     * @throws Exception
     */
    private static void zipEntry(String sourcePath,
                                File sourceFile,
                                String targetDir,
                                ZipOutputStream zipOutputStream) throws Exception{

        // 만일 디렉토리명이 .metadata라면 처리하지 않고 skip한다.
        if (sourceFile.isDirectory()) {
            if(sourceFile.getName().equalsIgnoreCase(".metadata")) {
                return;
            }

            File[] fileArray = sourceFile.listFiles();
            for(int i = 0; i < fileArray.length; i++) { // 디렉토리면 디렉토리 내 파일 목록을 가지고 재귀호출
                zipEntry(sourcePath, fileArray[i], targetDir,zipOutputStream);
            }
        } else {
            BufferedInputStream inputStream = null;
            byte[] buffer = new byte[BUFFER_SIZE];
            try {
                if (sourceFile.getAbsolutePath().equalsIgnoreCase(targetDir)) {
                    return;
                }

                String strAbsPath = sourceFile.getPath(); // 압축대상 파일의 절대경로

                // 압축대상 파일의 절대경로에서 원본경로를 제외한 경로를 추출
                // ex) /test/test.xml 에서 test.xml을 압축하면 sourcePath = /test/,
                // 압축대상의 절대경로는 /test/test.xml 이므로 zipEntryName은 test.xml 이 된다.
                // ex2) 만약 디렉토리 내의 파일을 압축하면(디렉토리도 압축에 포함됨), /test/dir/test.xml 에서 dir 을 압축하면
                // sourePath = /test/, 압축대상의 절대경로는 /test/dir/test.xml 이므로 zipEntryName은 dir/test.xml 이 된다.
                // 이 상태로 압축하면 압축파일 내에 dir 디렉토리도 생성됨.
                // sourcePath를 조절해서 압축대상 dir도 제외가능
                String strZipEntryName = strAbsPath.substring(sourcePath.length() + 1, strAbsPath.length());

                inputStream = new BufferedInputStream(new FileInputStream(sourceFile));
                ZipEntry zentry = new ZipEntry(strZipEntryName);
                zentry.setTime(sourceFile.lastModified());
                zipOutputStream.putNextEntry(zentry);

                int cnt =0;
                while ( (cnt = inputStream.read(buffer, 0, BUFFER_SIZE)) != -1) {
                    zipOutputStream.write(buffer, 0, cnt);
                }

                zipOutputStream.closeEntry();
            }
            catch (Exception e) {
                e.printStackTrace();
            }
            finally {
                if (inputStream != null) {
                    inputStream.close();
                }
            }
        }
    }

    /**
     * 압축 대상 파일이나 폴더를 압축 파일에 추가하여 압축한다.
     * @param sourcePath 압축할 디렉토리 또는 파일이 위치한 경로. 즉 압축대상의 부모의 경로 / 예) D:\APIs\
     * @param sourceFile 압축할 디렉토리명 또는 이름 / 예) D:\APIs\ 내의 압축대상 j2sdk-1_4_2-doc
     * @param targetDir 압축한 zip 파일을 위치시킬 디렉토리 경로와 이름 / 예) D:\APIs
     * @param zipFileName zip파일명
     * @throws Exception
     */
    private static void zipEntry(String sourcePath,
                                    File sourceFile,
                                    String targetDir,
                                    String zipFileName) throws Exception {

        // java.util.zip.ZipOutputStream을 사용하면 압축시 한글 파일명은 깨지는 버그가 발생
        // 집출력 스트림에 집파일을 넣는다.
        ZipOutputStream zoutput = new ZipOutputStream((OutputStream) new FileOutputStream(new File(zipFileName)));

        zipEntry(sourcePath, sourceFile, targetDir, zoutput);

        if(zoutput != null)
            zoutput.close();
    }


[zip] 압축하기2

프로그래밍/Java 2010. 10. 8. 17:34 Posted by galad
아래 내용으로는 뭔가 부족해서 검색중에 발견. http://tjsoftware.tistory.com/6
훨씬 깔끔하고 좋다...

다만 주석 내용이 소스랑 다른 부분이 있어서 그 부분 주석 수정 및 기타 주석을 추가했음.
zipEntry() 이외는 직접 작성.

        // 폴더 안에 있는 파일들을 파일 배열 객체로 가져온다.
        File[] fileArray = sourceFile.listFiles();

        // 압축할 파일 이름
        String zfileNm = filePath + ".zip";
        int num = 1;
        while (new File(zfileNm).exists()) { // 압축할 파일 명이 존재한다면 다른 이름으로 파일명을 생성
            zfileNm = filePath + "_" + num++ + ".zip";
        }
        System.out.println("Zip File Path and Name : " + zfileNm);

        // Zip 파일을 만든다.
        File zfile = new File(zfileNm);

        // Zip 파일 객체를 출력 스트림에 넣는다.
        foutput = new FileOutputStream(zfile);

        // 집출력 스트림에 집파일을 넣는다.
        zoutput = new ZipOutputStream((OutputStream)foutput);

        long beginTime = System.currentTimeMillis();

        // 실제 압축 처리
        zipEntry(dirPath, sourceFile, dirPath, zoutput);

        if (zoutput != null) {
            zoutput.close();
        }
        if (foutput != null) {
            foutput.close();
        }

        long msec = System.currentTimeMillis() - beginTime;

        System.out.println("Check :: >> " + msec/1000 + "." + (msec % 1000) + " sec. elapsed...");

    /**
     * 압축 대상 파일이나 폴더를 압축 파일에 추가하여 압축한다.
     * 만일 넘겨 받은 파일이 폴더라면 하위 디렉토리 압축을 위해 재귀함수 호출로 처리한다.
     * @param sourcePath 압축할 디렉토리/파일의 경로 / 예) D:\APIs\
     * @param sourceFile 압축할 디렉토리 경로와 이름 / 예) D:\APIs\ 내의 압축대상 j2sdk-1_4_2-doc
     * @param targetDir 압축한 zip 파일을 위치시킬 디렉토리 경로와 이름 / 예) D:\APIs
     * @param zipOutputStream Zip출력스트림 - 압축할 zip 파일에 대한 zip출력스트림. / 예) D:\APIs\zipModuleTest.zip
     * @throws Exception
     */
    private static void zipEntry(String sourcePath,
                                File sourceFile,
                                String targetDir,
                                ZipOutputStream zipOutputStream) throws Exception{

        // 만일 디렉토리명이 .metadata라면 처리하지 않고 skip한다.
        if (sourceFile.isDirectory()) {
            if(sourceFile.getName().equalsIgnoreCase(".metadata")) {
                return;
            }

            File[] fileArray = sourceFile.listFiles();
            for(int i = 0; i < fileArray.length; i++) { // 디렉토리면 디렉토리 내 파일 목록을 가지고 재귀호출
                zipEntry(sourcePath, fileArray[i], targetDir,zipOutputStream);
            }
        } else {
            BufferedInputStream inputStream = null;
            byte[] buffer = new byte[BUFFER_SIZE];
            try {
                if (sourceFile.getAbsolutePath().equalsIgnoreCase(targetDir)) {
                    return;
                }

                String strAbsPath = sourceFile.getPath(); // 압축대상 파일의 절대경로

                // 압축대상 파일의 절대경로에서 원본경로를 제외한 경로를 추출
                // ex) /test/test.xml 에서 test.xml을 압축하면 sourcePath = /test/, 압축대상의 절대경로는 /test/test.xml 이므로
                // zipEntryName은 test.xml 이 된다.
                // ex2) 만약 디렉토리 내의 파일을 압축하면(디렉토리도 압축에 포함됨), /test/dir/test.xml 에서 dir 을 압축하면
                // sourePath = /test/, 압축대상의 절대경로는 /test/dir/test.xml 이므로 zipEntryName은 dir/test.xml 이 된다.
                // 이 상태로 압축하면 압축파일 내에 dir 디렉토리도 생성됨.
                String strZipEntryName = strAbsPath.substring(sourcePath.length() + 1, strAbsPath.length());

                inputStream = new BufferedInputStream(new FileInputStream(sourceFile));
                ZipEntry zentry = new ZipEntry(strZipEntryName);
                zentry.setTime(sourceFile.lastModified());
                zipOutputStream.putNextEntry(zentry);

                int cnt =0;
                while ( (cnt = inputStream.read(buffer, 0, BUFFER_SIZE)) != -1) {
                    zipOutputStream.write(buffer, 0, cnt);
                }

                zipOutputStream.closeEntry();
            }
            catch (Exception e) {
                e.printStackTrace();
            }
            finally {
                if (inputStream != null) {
                    inputStream.close();
                }
            }
        }
    }

체크 포인트
1. ZipEntry 생성 시 디렉토리명/파일명 으로 생성하면, 압축 시 디렉토리도 같이 생성됨.
2. zipEntry(dirPath, sourceFile, dirPath, zoutput)
 
- dirPath : 압축 대상(디렉토리/파일)의 부모 디렉토리의 경로
 - sourceFile : 압축 대상 디렉토리 혹은 파일. File class
 - targetDir : 압축된 zip 파일이 위치할 디렉토리 경로. 특별히 필요는 없는 듯
 - zipoutput : 실제 압축될 zip 파일. ZipOutputStream class.
> 예를 들어, c:\test\test\test.xml 이 있고 c:\test\test 를 c:\test\test.zip 으로 압축한다고 하면
 dirPath = c:\test\
 sourceFile = new File(c:\test\).listFiles() 
 targetDir = c:\test\
 zipoutput = new ZipOutputStream((OutputStream)new FileOutputStream(c:\test\test.zip))
3. stream close 하는 것 까먹지 말 것. zip 파일을 못 열게됨.

'프로그래밍 > Java' 카테고리의 다른 글

[java/펌] Java Character Set의 이해  (0) 2010.11.11
[zip] 압축하기3  (0) 2010.10.11
[zip] zip 압축하기/압축풀기  (0) 2010.10.08
[java] zip 파일 압축풀기  (0) 2010.09.28
[java] String, StringBuffer, StringBuilder  (0) 2010.09.28

[zip] zip 압축하기/압축풀기

프로그래밍/Java 2010. 10. 8. 15:36 Posted by galad
http://kwaknu.egloos.com/4989599
http://yeon97.egloos.com/1551569
http://sourceforge.net/projects/jazzlib/

아래 내용은 위의 伏地不動 님의 블로그에서 복사한 글입니다.
오직 저장의 목적으로만 사용함을 밝힙니다.

import system.log.Logger;
import system.exception.Exception;

import java.io.*;
import java.util.zip.ZipEntry;
import java.util.zip.ZipOutputStream;


/**
 * Created by IntelliJ IDEA.
 * Date: 2006. 7. 6
 * Time: 오후 3:48:11
 * To change this template use File | Settings | File Templates.

 * java.util.zip에 있는 놈을 쓰게 되면 압축할 때 한글명으로 된 파일은 깨져서 들어간다..

 * 결국 그때문에 나중에 압축을 풀때 에러가 나게 된다...

 * 해서 이놈을 jazzlib 라이브러리를 사용하여 해결하였다....
 */

public class compressTest {
    static Logger logger = (Logger)Logger.getLogger();
    static final int COMPRESSION_LEVEL = 8;
    static final int BUFFER_SIZE = 64*1024;


    public static void main(String[] args) throws IOException {
        // 압축할 폴더를 설정한다.
        String targetDir = "D:\\test\\testest";
        // 현재 시간을 설정한다.
        long beginTime = System.currentTimeMillis();
        int cnt;
        byte[] buffer = new byte[BUFFER_SIZE];
        FileInputStream finput = null;
        FileOutputStream foutput;


        /*
         **********************************************************************************
         * java.util.zip.ZipOutputStream을 사용하면 압축시 한글 파일명은 깨지는 버그가

         * 발생합니다.
         * 이것은 나중에 그 압축 파일을 해제할 때 계속 한글 파일명이 깨는 에러가 됩니다.
         * 현재 Sun의 공식 입장은 이 버그를 향후 수정할 계획이 없다고 하며
         * 자체적으로 공식적 버그라고 인정하고 있지 않습니다.
         * 이런 비영어권의 설움...ㅠ.ㅠ
         * 해서 이 문제를 해결한 net.sf.jazzlib.ZipOutputStream을 추가하오니

         * 이 라이브러리 사용을 권장하는 바입니다.
         *********************************************************************************/
        net.sf.jazzlib.ZipOutputStream zoutput;


        /*
         ********************************************
         * 압축할 폴더명을 얻는다. : 절대 경로가 넘어올 경우 --> 상대경로로 변경한다...
         *********************************************/
        targetDir.replace('\\', File.separatorChar);
        targetDir.replace('/', File.separatorChar);
        String dirNm = targetDir.substring(targetDir.lastIndexOf(File.separatorChar)+1

                                                        , targetDir.length());

        // 압축할 폴더를 파일 객체로 생성한다.
        File file = new File(targetDir);
        String filePath = file.getAbsolutePath();
        logger.debug("File Path : " + file.getAbsolutePath());


        /*
         **************************************************************************
         * 폴더인지 파일인지 확인한다...
         * 만약 넘겨받은 인자가 파일이면 그 파일의 상위 디렉토리를 타겟으로 하여 압축한다.
         *****************************************************************************/
        if (file.isDirectory()) {
            logger.debug("Directory.........");
        } else {
            file = new File(file.getParent());
        }

        // 폴더 안에 있는 파일들을 파일 배열 객체로 가져온다.
        File[] fileArray = file.listFiles();


        /*
         *****************************************************************
         * 압축할 파일 이름을 정한다.
         * 압축할 파일 명이 존재한다면 다른 이름으로 파일명을 생성한다.
         *****************************************************************/
        String zfileNm = filePath + ".zip";
        int num = 1;
        while (new File(zfileNm).exists()) {
            zfileNm = filePath + "_" + num++ + ".zip";
        }

        logger.debug("Zip File Path and Name : " + zfileNm);

        // Zip 파일을 만든다.
        File zfile = new File(zfileNm);
        // Zip 파일 객체를 출력 스트림에 넣는다.
        foutput = new FileOutputStream(zfile);

        // 집출력 스트림에 집파일을 넣는다.
        zoutput = new net.sf.jazzlib.ZipOutputStream((OutputStream)foutput);

        net.sf.jazzlib.ZipEntry zentry = null;


        try {
            for (int i=0; i < fileArray.length; i++) {
                // 압축할 파일 배열 중 하나를 꺼내서 입력 스트림에 넣는다.
                finput = new FileInputStream(fileArray[i]);

                // ze = new net.sf.jazzlib.ZipEntry ( inFile[i].getName());
                zentry = new net.sf.jazzlib.ZipEntry(fileArray[i].getName());

                logger.debug("Target File Name for Compression : "

                                    + fileArray[i].getName()

                                    + ", File Size : "

                                    + finput.available());

                zoutput.putNextEntry(zentry);


                /*
                 ****************************************************************
                 * 압축 레벨을 정하는것인데 9는 가장 높은 압축률을 나타냅니다.
                 * 그 대신 속도는 젤 느립니다. 디폴트는 8입니다.
                 *****************************************************************/
                zoutput.setLevel(COMPRESSION_LEVEL);

                cnt = 0;
                while ((cnt = finput.read(buffer)) != -1) {
                    zoutput.write(buffer, 0, cnt);
                }

                finput.close();
                zoutput.closeEntry();
            }
            zoutput.close();
            foutput.close();
        } catch (Exception e) {
            logger.fatal("Compression Error : " + e.toString());
            /*
             **********************************************
             * 압축이 실패했을 경우 압축 파일을 삭제한다.
             ***********************************************/
            logger.error(zfile.toString() + " : 압축이 실패하여 파일을 삭제합니다...");
            if (!zfile.delete()) {
                logger.error(zfile.toString() + " : 파일 삭제가 실패하여 다시 삭제합니다...");
                while(!zfile.delete()) {
                    logger.error(zfile.toString() + " : 삭제가 실패하여 다시 삭제합니다....");
                }
            }
            e.printStackTrace();
            throw new Exception(e);
        } finally {
            if (finput != null) {
                finput.close();
            }
            if (zoutput != null) {
                zoutput.close();
            }
            if (foutput != null) {
                foutput.close();
            }
        }

        long msec = System.currentTimeMillis() - beginTime;

        logger.debug("Check :: >> " + msec/1000 + "." + (msec % 1000) + " sec. elapsed...");
    }
}


'프로그래밍 > Java' 카테고리의 다른 글

[zip] 압축하기3  (0) 2010.10.11
[zip] 압축하기2  (0) 2010.10.08
[java] zip 파일 압축풀기  (0) 2010.09.28
[java] String, StringBuffer, StringBuilder  (0) 2010.09.28
[junit] 멀티스레드 테스트  (0) 2010.09.27

[펌] jQuery Fundamentals

프로그래밍/Web 2010. 10. 7. 10:46 Posted by galad
http://jqfundamentals.com/book/book.html

아래의 내용은 위의 링크의 내용을 그대로 복사한 것입니다.
단지 보존의 목적으로만 사용함을 밝힙니다.

With contributions by James Padolsey, Paul Irish, and others. See the GitHub repository for a complete history of contributions.

Licensed by Rebecca Murphey under the Creative Commons Attribution-Share Alike 3.0 United States license. You are free to copy, distribute, transmit, and remix this work, provided you attribute the work to Rebecca Murphey as the original author and reference the GitHub repository for the work. If you alter, transform, or build upon this work, you may distribute the resulting work only under the same, similar or a compatible license. Any of the above conditions can be waived if you get permission from the copyright holder. For any reuse or distribution, you must make clear to others the license terms of this work. The best way to do this is with a link to the license.


Table of Contents

1. Welcome
Getting the Code
Software
Adding JavaScript to Your Page
JavaScript Debugging
Exercises
Conventions used in this book
Reference Material
I. JavaScript 101
2. JavaScript Basics
Overview
Syntax Basics
Operators
Basic Operators
Operations on Numbers & Strings
Logical Operators
Comparison Operators
Conditional Code
Truthy and Falsy Things
Conditional Variable Assignment with The Ternary Operator
Switch Statements
Loops
The for loop
The while loop
The do-while loop
Breaking and continuing
Reserved Words
Arrays
Objects
Functions
Using Functions
Self-Executing Anonymous Functions
Functions as Arguments
Testing Type
Scope
Closures
II. jQuery: Basic Concepts
3. jQuery Basics
$(document).ready()
Selecting Elements
Does My Selection Contain Any Elements?
Saving Selections
Refining & Filtering Selections
Selecting Form Elements
Working with Selections
Chaining
Getters & Setters
CSS, Styling, & Dimensions
Using CSS Classes for Styling
Dimensions
Attributes
Traversing
Manipulating Elements
Getting and Setting Information about Elements
Moving, Copying, and Removing Elements
Creating New Elements
Manipulating Attributes
Exercises
Selecting
Traversing
Manipulating
4. jQuery Core
$ vs $()
Utility Methods
Checking types
Data Methods
Feature & Browser Detection
Avoiding Conflicts with Other Libraries
5. Events
Overview
Connecting Events to Elements
Connecting Events to Run Only Once
Disconnecting Events
Namespacing Events
Inside the Event Handling Function
Triggering Event Handlers
Increasing Performance with Event Delegation
Unbinding Delegated Events
Event Helpers
$.fn.hover
$.fn.toggle
Exercises
Create an Input Hint
Add Tabbed Navigation
6. Effects
Overview
Built-in Effects
Changing the Duration of Built-in Effects
Doing Something when an Effect is Done
Custom Effects with $.fn.animate
Easing
Managing Effects
Exercises
Reveal Hidden Text
Create Dropdown Menus
Create a Slideshow
7. Ajax
Overview
Key Concepts
GET vs. Post
Data Types
A is for Asynchronous
Same-Origin Policy and JSONP
Ajax and Firebug
jQuery's Ajax-Related Methods
$.ajax
Convenience Methods
$.fn.load
Ajax and Forms
Working with JSONP
Ajax Events
Exercises
Load External Content
Load Content Using JSON
8. Plugins
What exactly is a plugin?
How to create a basic plugin
Finding & Evaluating Plugins
Writing Plugins
Writing Stateful Plugins with the jQuery UI Widget Factory
Adding Methods to a Widget
Working with Widget Options
Adding Callbacks
Cleaning Up
Conclusion
Exercises
Make a Table Sortable
Write a Table-Striping Plugin
III. Advanced Topics
This Section is a Work in Progress
9. Performance Best Practices
Cache length during loops
Append new content outside of a loop
Keep things DRY
Beware anonymous functions
Optimize Selectors
ID-Based Selectors
Specificity
Avoid the Universal Selector
Use Event Delegation
Detach Elements to Work With Them
Use Stylesheets for Changing CSS on Many Elements
Use $.data Instead of $.fn.data
Don't Act on Absent Elements
Variable Definition
Conditionals
Don't Treat jQuery as a Black Box
10. Code Organization
Overview
Key Concepts
Encapsulation
The Object Literal
The Module Pattern
Managing Dependencies
Getting RequireJS
Using RequireJS with jQuery
Creating Reusable Modules with RequireJS
Optimizing Your Code: The RequireJS Build Tool
Exercises
Create a Portlet Module
11. Custom Events
Introducing Custom Events
A Sample Application

List of Examples

1.1. An example of inline Javascript
1.2. An example of including external JavaScript
1.3. Example of an example
2.1. A simple variable declaration
2.2. Whitespace has no meaning outside of quotation marks
2.3. Parentheses indicate precedence
2.4. Tabs enhance readability, but have no special meaning
2.5. Concatenation
2.6. Multiplication and division
2.7. Incrementing and decrementing
2.8. Addition vs. concatenation
2.9. Forcing a string to act as a number
2.10. Forcing a string to act as a number (using the unary-plus operator)
2.11. Logical AND and OR operators
2.12. Comparison operators
2.13. Flow control
2.14. Values that evaluate to true
2.15. Values that evaluate to false
2.16. The ternary operator
2.17. A switch statement
2.18. Loops
2.19. A typical for loop
2.20. A typical while loop
2.21. A while loop with a combined conditional and incrementer
2.22. A do-while loop
2.23. Stopping a loop
2.24. Skipping to the next iteration of a loop
2.25. A simple array
2.26. Accessing array items by index
2.27. Testing the size of an array
2.28. Changing the value of an array item
2.29. Adding elements to an array
2.30. Working with arrays
2.31. Creating an "object literal"
2.32. Function Declaration
2.33. Named Function Expression
2.34. A simple function
2.35. A function that returns a value
2.36. A function that returns another function
2.37. A self-executing anonymous function
2.38. Passing an anonymous function as an argument
2.39. Passing a named function as an argument
2.40. Testing the type of various variables
2.41. Functions have access to variables defined in the same scope
2.42. Code outside the scope in which a variable was defined does not have access to the variable
2.43. Variables with the same name can exist in different scopes with different values
2.44. Functions can "see" changes in variable values after the function is defined
2.45. Scope insanity
2.46. How to lock in the value of i?
2.47. Locking in the value of i with a closure
3.1. A $(document).ready() block
3.2. Shorthand for $(document).ready()
3.3. Passing a named function instead of an anonymous function
3.4. Selecting elements by ID
3.5. Selecting elements by class name
3.6. Selecting elements by attribute
3.7. Selecting elements by compound CSS selector
3.8. Pseudo-selectors
3.9. Testing whether a selection contains elements
3.10. Storing selections in a variable
3.11. Refining selections
3.12. Using form-related pseduo-selectors
3.13. Chaining
3.14. Formatting chained code
3.15. Restoring your original selection using $.fn.end
3.16. The $.fn.html method used as a setter
3.17. The html method used as a getter
3.18. Getting CSS properties
3.19. Setting CSS properties
3.20. Working with classes
3.21. Basic dimensions methods
3.22. Setting attributes
3.23. Getting attributes
3.24. Moving around the DOM using traversal methods
3.25. Iterating over a selection
3.26. Changing the HTML of an element
3.27. Moving elements using different approaches
3.28. Making a copy of an element
3.29. Creating new elements
3.30. Creating a new element with an attribute object
3.31. Getting a new element on to the page
3.32. Creating and adding an element to the page at the same time
3.33. Manipulating a single attribute
3.34. Manipulating multiple attributes
3.35. Using a function to determine an attribute's new value
4.1. Checking the type of an arbitrary value
4.2. Storing and retrieving data related to an element
4.3. Storing a relationship between elements using $.fn.data
4.4. Putting jQuery into no-conflict mode
4.5. Using the $ inside a self-executing anonymous function
5.1. Event binding using a convenience method
5.2. Event biding using the $.fn.bind method
5.3. Event binding using the $.fn.bind method with data
5.4. Switching handlers using the $.fn.one method
5.5. Unbinding all click handlers on a selection
5.6. Unbinding a particular click handler
5.7. Namespacing events
5.8. Preventing a link from being followed
5.9. Triggering an event handler the right way
5.10. Event delegation using $.fn.delegate
5.11. Event delegation using $.fn.live
5.12. Unbinding delegated events
5.13. The hover helper function
5.14. The toggle helper function
6.1. A basic use of a built-in effect
6.2. Setting the duration of an effect
6.3. Augmenting jQuery.fx.speeds with custom speed definitions
6.4. Running code when an animation is complete
6.5. Run a callback even if there were no elements to animate
6.6. Custom effects with $.fn.animate
6.7. Per-property easing
7.1. Using the core $.ajax method
7.2. Using jQuery's Ajax convenience methods
7.3. Using $.fn.load to populate an element
7.4. Using $.fn.load to populate an element based on a selector
7.5. Turning form data into a query string
7.6. Creating an array of objects containing form data
7.7. Using YQL and JSONP
7.8. Setting up a loading indicator using Ajax Events
8.1. Creating a plugin to add and remove a class on hover
8.2. The Mike Alsup jQuery Plugin Development Pattern
8.3. A simple, stateful plugin using the jQuery UI widget factory
8.4. Passing options to a widget
8.5. Setting default options for a widget
8.6. Creating widget methods
8.7. Calling methods on a plugin instance
8.8. Responding when an option is set
8.9. Providing callbacks for user extension
8.10. Binding to widget events
8.11. Adding a destroy method to a widget
10.1. An object literal
10.2. Using an object literal for a jQuery feature
10.3. The module pattern
10.4. Using the module pattern for a jQuery feature
10.5. Using RequireJS: A simple example
10.6. A simple JavaScript file with dependencies
10.7. Defining a RequireJS module that has no dependencies
10.8. Defining a RequireJS module with dependencies
10.9. Defining a RequireJS module that returns a function
10.10. A RequireJS build configuration file

jQuery is fast becoming a must-have skill for front-end developers. The purpose of this book is to provide an overview of the jQuery JavaScript library; when you're done with the book, you should be able to complete basic tasks using jQuery, and have a solid basis from which to continue your learning. This book was designed as material to be used in a classroom setting, but you may find it useful for individual study.

This is a hands-on class. We will spend a bit of time covering a concept, and then you’ll have the chance to work on an exercise related to the concept. Some of the exercises may seem trivial; others may be downright daunting. In either case, there is no grade; the goal is simply to get you comfortable working your way through problems you’ll commonly be called upon to solve using jQuery. Example solutions to all of the exercises are included in the sample code.

The code we’ll be using in this book is hosted in a repository on Github. You can download a .zip or .tar file of the code, then uncompress it to use it on your server. If you’re git-inclined, you’re welcome to clone or fork the repository.

Logical operators allow you to evaluate a series of operands using AND and OR operations.


Though it may not be clear from the example, the || operator returns the value of the first truthy operand, or, in cases where neither operand is truthy, it'll return the last of both operands. The &&operator returns the value of the first false operand, or the value of the last operand if both operands are truthy.

Be sure to consult the section called “Truthy and Falsy Things” for more details on which values evaluate to true and which evaluate to false.

Note

You'll sometimes see developers use these logical operators for flow control instead of using if statements. For example:

// do something with foo if foo is truthy
foo && doSomething(foo);

// set bar to baz if baz is truthy;
// otherwise, set it to the return
// value of createBar()
var bar = baz || createBar();

This style is quite elegant and pleasantly terse; that said, it can be really hard to read, especially for beginners. I bring it up here so you'll recognize it in code you read, but I don't recommend using it until you're extremely comfortable with what it means and how you can expect it to behave.

Sometimes you only want to run a block of code under certain conditions. Flow control — via if andelse blocks — lets you run code only under certain conditions.


Note

While curly braces aren't strictly required around single-line if statements, using them consistently, even when they aren't strictly required, makes for vastly more readable code.

Be mindful not to define functions with the same name multiple times within separate if/elseblocks, as doing so may not have the expected result.

Loops let you run a block of code a certain number of times.


Note that in 
Example 2.18, “Loops” even though we use the keyword var before the variable namei, this does not "scope" the variable i to the loop block. We'll discuss scope in depth later in this chapter.

Functions contain blocks of code that need to be executed repeatedly. Functions can take zero or more arguments, and can optionally return a value.

Functions can be created in a variety of ways:


I prefer the named function expression method of setting a function's name, for some rather in-depth and technical reasons. You are likely to see both methods used in others' JavaScript code.

"Scope" refers to the variables that are available to a piece of code at a given time. A lack of understanding of scope can lead to frustrating debugging experiences.

When a variable is declared inside of a function using the var keyword, it is only available to code inside of that function -- code outside of that function cannot access the variable. On the other hand, functions defined inside that function will have access to to the declared variable.

Furthermore, variables that are declared inside a function without the var keyword are not local to the function -- JavaScript will traverse the scope chain all the way up to the window scope to find where the variable was previously defined. If the variable wasn't previously defined, it will be defined in the global scope, which can have extremely unexpected consequences;


The most basic concept of jQuery is to “select some elements and do something with them.” jQuery supports most CSS3 selectors, as well as some non-standard selectors. For a complete selector reference, visit http://api.jquery.com/category/selectors/.

Following are a few examples of common selection techniques.


Note

When you use the :visible and :hidden pseudo-selectors, jQuery tests the actual visibility of the element, not its CSS visibility or display — that is, it looks to see if the element's physical height and width on the page are both greater than zero. However, this test doesn't work with <tr> elements; in this case, jQuery does check the CSS display property, and considers an element hidden if its display property is set to none. Elements that have not been added to the DOM will always be considered hidden, even if the CSS that would affect them would render them visible. (See the Manipulation section later in this chapter to learn how to create and add elements to the DOM.)

For reference, here is the code jQuery uses to determine whether an element is visible or hidden, with comments added for clarity:

jQuery.expr.filters.hidden = function( elem ) {
    var width = elem.offsetWidth, height = elem.offsetHeight,
        skip = elem.nodeName.toLowerCase() === "tr";

    // does the element have 0 height, 0 width, 
    // and it's not a <tr>?
    return width === 0 && height === 0 && !skip ?

        // then it must be hidden
        true :

        // but if it has width and height 
        // and it's not a <tr>
        width > 0 && height > 0 && !skip ?

            // then it must be visible
            false :

            // if we get here, the element has width
            // and height, but it's also a <tr>,
            // so check its display property to
            // decide whether it's hidden
            jQuery.curCSS(elem, "display") === "none";
};

jQuery.expr.filters.visible = function( elem ) {
    return !jQuery.expr.filters.hidden( elem );
};

Every time you make a selection, a lot of code runs, and jQuery doesn't do caching of selections for you. If you've made a selection that you might need to make again, you should save the selection in a variable rather than making the selection repeatedly.


Note

In Example 3.10, “Storing selections in a variable”, the variable name begins with a dollar sign. Unlike in other languages, there's nothing special about the dollar sign in JavaScript -- it's just another character. We use it here to indicate that the variable contains a jQuery object. This practice -- a sort of Hungarian notation -- is merely convention, and is not mandatory.

Once you've stored your selection, you can call jQuery methods on the variable you stored it in just like you would have called them on the original selection.

Note

A selection only fetches the elements that are on the page when you make the selection. If you add elements to the page later, you'll have to repeat the selection or otherwise add them to the selection stored in the variable. Stored selections don't magically update when the DOM changes.

Once you have a selection, you can call methods on the selection. Methods generally come in two different flavors: getters and setters. Getters return a property of the first selected element; setters set a property on all selected elements.

jQuery includes a handy way to get and set CSS properties of elements.

Note

CSS properties that normally include a hyphen need to be camel cased in JavaScript. For example, the CSS property font-size is expressed asfontSize in JavaScript.


Note the style of the argument we use on the second line -- it is an object that contains multiple properties. This is a common way to pass multiple arguments to a function, and many jQuery setter methods accept objects to set mulitple values at once.

Once you've made a selection, the fun begins. You can change, move, remove, and clone elements. You can also create new elements via a simple syntax.

For complete documentation of jQuery manipulation methods, visithttp://api.jquery.com/category/manipulation/.

There are any number of ways you can change an existing element. Among the most common tasks you'll perform is changing the inner HTML or attribute of an element. jQuery offers simple, cross-browser methods for these sorts of manipulations. You can also get information about elements using many of the same methods in their getter incarnations. We'll see examples of these throughout this section, but specifically, here are a few methods you can use to get and set information about elements.

Note

Changing things about elements is trivial, but remember that the change will affect all elements in the selection, so if you just want to change one element, be sure to specify that in your selection before calling a setter method.

Note

When methods act as getters, they generally only work on the first element in the selection, and they do not return a jQuery object, so you can't chain additional methods to them. One notable exception is $.fn.text; as mentioned below, it gets the text for all elements in the selection.

$.fn.html

Get or set the html contents.

$.fn.text

Get or set the text contents; HTML will be stripped.

$.fn.attr

Get or set the value of the provided attribute.

$.fn.width

Get or set the width in pixels of the first element in the selection as an integer.

$.fn.height

Get or set the height in pixels of the first element in the selection as an integer.

$.fn.position

Get an object with position information for the first element in the selection, relative to its first positioned ancestor. This is a getter only.

$.fn.val

Get or set the value of form elements.


There are a variety of ways to move elements around the DOM; generally, there are two approaches:

  • Place the selected element(s) relative to another element

  • Place an element relative to the selected element(s)

For example, jQuery provides $.fn.insertAfter and $.fn.after. The $.fn.insertAftermethod places the selected element(s) after the element that you provide as an argument; the$.fn.after method places the element provided as an argument after the selected element. Several other methods follow this pattern: $.fn.insertBefore and $.fn.before;$.fn.appendTo and $.fn.append; and $.fn.prependTo and $.fn.prepend.

The method that makes the most sense for you will depend on what elements you already have selected, and whether you will need to store a reference to the elements you're adding to the page. If you need to store a reference, you will always want to take the first approach -- placing the selected elements relative to another element -- as it returns the element(s) you're placing. In this case,$.fn.insertAfter, $.fn.insertBefore, $.fn.appendTo, and $.fn.prependTo will be your tools of choice.


jQuery offers a trivial and elegant way to create new elements using the same $() method you use to make selections.


Note that in the attributes object we included as the second argument, the property name class is quoted, while the property names text and href are not. Property names generally do not need to be quoted unless they are reserved words (as class is in this case).

When you create a new element, it is not immediately added to the page. There are several ways to add an element to the page once it's been created.


Strictly speaking, you don't have to store the created element in a variable -- you could just call the method to add the element to the page directly after the $(). However, most of the time you will want a reference to the element you added, so you don't need to select it later.

You can even create an element as you're adding it to the page, but note that in this case you don't get a reference to the newly created element.


Note

The syntax for adding new elements to the page is so easy, it's tempting to forget that there's a huge performance cost for adding to the DOM repeatedly. If you are adding many elements to the same container, you'll want to concatenate all the html into a single string, and then append that string to the container instead of appending the elements one at a time. You can use an array to gather all the pieces together, then join them into a single string for appending.

var myItems = [], $myList = $('#myList');

for (var i=0; i<100; i++) {
    myItems.push('<li>item ' + i + '</li>');
}

$myList.append(myItems.join(''));

jQuery offers several utility methods in the $ namespace. These methods are helpful for accomplishing routine programming tasks. Below are examples of a few of the utility methods; for a complete reference on jQuery utility methods, visit http://api.jquery.com/category/utilities/.

$.trim

Removes leading and trailing whitespace.

$.trim('    lots of extra whitespace    ');
// returns 'lots of extra whitespace'
$.each

Iterates over arrays and objects.

$.each([ 'foo', 'bar', 'baz' ], function(idx, val) {
    console.log('element ' + idx + 'is ' + val);
});

$.each({ foo : 'bar', baz : 'bim' }, function(k, v) {
    console.log(k + ' : ' + v);
});

Note

There is also a method $.fn.each, which is used for iterating over a selection of elements.

$.inArray

Returns a value's index in an array, or -1 if the value is not in the array.

var myArray = [ 1, 2, 3, 5 ];

if ($.inArray(4, myArray) !== -1) {
    console.log('found it!');
}
$.extend

Changes the properties of the first object using the properties of subsequent objects.

var firstObject = { foo : 'bar', a : 'b' };
var secondObject = { foo : 'baz' };

var newObject = $.extend(firstObject, secondObject);
console.log(firstObject.foo); // 'baz'
console.log(newObject.foo);   // 'baz'

If you don't want to change any of the objects you pass to $.extend, pass an empty object as the first argument.

var firstObject = { foo : 'bar', a : 'b' };
var secondObject = { foo : 'baz' };

var newObject = $.extend({}, firstObject, secondObject);
console.log(firstObject.foo); // 'bar'
console.log(newObject.foo);   // 'baz'
$.proxy

Returns a function that will always run in the provided scope — that is, sets the meaning of thisinside the passed function to the second argument.

var myFunction = function() { console.log(this); };
var myObject = { foo : 'bar' };

myFunction(); // logs window object

var myProxyFunction = $.proxy(myFunction, myObject);
myProxyFunction(); // logs myObject object

If you have an object with methods, you can pass the object and the name of a method to return a function that will always run in the scope of the object.

var myObject = {
    myFn : function() {
        console.log(this);
    }
};

$('#foo').click(myObject.myFn); // logs DOM element #foo
$('#foo').click($.proxy(myObject, 'myFn')); // logs myObject

As your work with jQuery progresses, you'll find that there's often data about an element that you want to store with the element. In plain JavaScript, you might do this by adding a property to the DOM element, but you'd have to deal with memory leaks in some browsers. jQuery offers a straightforward way to store data related to an element, and it manages the memory issues for you.


You can store any kind of data on an element, and it's hard to overstate the importance of this when you get into complex application development. For the purposes of this class, we'll mostly use$.fn.data to store references to other elements.

For example, we may want to establish a relationship between a list item and a div that's inside of it. We could establish this relationship every single time we interact with the list item, but a better solution would be to establish the relationship once, and then store a pointer to the div on the list item using $.fn.data:


In addition to passing $.fn.data a single key-value pair to store data, you can also pass an object containing one or more pairs.

Although jQuery eliminates most JavaScript browser quirks, there are still occasions when your code needs to know about the browser environment.

jQuery offers the $.support object, as well as the deprecated $.browser object, for this purpose. For complete documentation on these objects, visit http://api.jquery.com/jQuery.support/ andhttp://api.jquery.com/jQuery.browser/.

The $.support object is dedicated to determining what features a browser supports; it is recommended as a more “future-proof” method of customizing your JavaScript for different browser environments.

The $.browser object was deprecated in favor of the $.support object, but it will not be removed from jQuery anytime soon. It provides direct detection of the browser brand and version.

jQuery offers convenience methods for most common events, and these are the methods you will see used most often. These methods -- including $.fn.click, $.fn.focus, $.fn.blur,$.fn.change, etc. -- are shorthand for jQuery's $.fn.bind method. The bind method is useful for binding the same hadler function to multiple events, and is also used when you want to provide data to the event hander, or when you are working with custom events.


You'll frequently use jQuery to add new elements to the page, and when you do, you may need to bind events to those new elements -- events you already bound to similar elements that were on the page originally. Instead of repeating your event binding every time you add elements to the page, you can use event delegation. With event delegation, you bind your event to a container element, and then when the event occurs, you look to see which contained element it occurred on. If this sounds complicated, luckily jQuery makes it easy with its $.fn.live and $.fn.delegate methods.

While most people discover event delegation while dealing with elements added to the page later, it has some performance benefits even if you never add more elements to the page. The time required to bind event handlers to hundreds of individual elements is non-trivial; if you have a large set of elements, you should consider delegating related events to a container element.

Note

The $.fn.live method was introduced in jQuery 1.3, and at that time only certain event types were supported. As of jQuery 1.4.2, the $.fn.delegatemethod is available, and is the preferred method.


Frequently used effects are built into jQuery as methods:

$.fn.show

Show the selected element.

$.fn.hide

Hide the selected elements.

$.fn.fadeIn

Animate the opacity of the selected elements to 100%.

$.fn.fadeOut

Animate the opacity of the selected elements to 0%.

$.fn.slideDown

Display the selected elements with a vertical sliding motion.

$.fn.slideUp

Hide the selected elements with a vertical sliding motion.

$.fn.slideToggle

Show or hide the selected elements with a vertical sliding motion, depending on whether the elements are currently visible.


Proper use of Ajax-related jQuery methods requires understanding some key concepts first.

jQuery generally requires some instruction as to the type of data you expect to get back from an Ajax request; in some cases the data type is specified by the method name, and in other cases it is provided as part of a configuration object. There are several options:

text

For transporting simple strings

html

For transporting blocks of HTML to be placed on the page

script

For adding a new script to the page

json

For transporting JSON-formatted data, which can include strings, arrays, and objects

Note

As of jQuery 1.4, if the JSON data sent by your server isn't properly formatted, the request may fail silently. See http://json.org for details on properly formatting JSON, but as a general rule, use built-in language methods for generating JSON on the server to avoid syntax issues.

jsonp

For transporting JSON data from another domain

xml

For transporting data in a custom XML schema

I am a strong proponent of using the JSON format in most cases, as it provides the most flexibility. It is especially useful for sending both HTML and data at the same time.

While jQuery does offer many Ajax-related convenience methods, the core $.ajax method is at the heart of all of them, and understanding it is imperative. We'll review it first, and then touch briefly on the convenience methods.

I generally use the $.ajax method and do not use convenience methods. As you'll see, it offers features that the convenience methods do not, and its syntax is more easily understandable, in my opinion.

jQuery’s core $.ajax method is a powerful and straightforward way of creating Ajax requests. It takes a configuration object that contains all the instructions jQuery requires to complete the request. The $.ajax method is particularly valuable because it offers the ability to specify both success and failure callbacks. Also, its ability to take a configuration object that can be defined separately makes it easier to write reusable code. For complete documentation of the configuration options, visit http://api.jquery.com/jQuery.ajax/.


Note

A note about the dataType setting: if the server sends back data that is in a different format than you specify, your code may fail, and the reason will not always be clear, because the HTTP response code will not show an error. When working with Ajax requests, make sure your server is sending back the data type you're asking for, and verify that the Content-type header is accurate for the data type. For example, for JSON data, the Content-type header should beapplication/json.

There are many, many options for the $.ajax method, which is part of its power. For a complete list of options, visit http://api.jquery.com/jQuery.ajax/; here are several that you will use frequently:

async

Set to false if the request should be sent synchronously. Defaults to true. Note that if you set this option to false, your request will block execution of other code until the response is received.

cache

Whether to use a cached response if available. Defaults to true for all dataTypes except "script" and "jsonp". When set to false, the URL will simply have a cachebusting parameter appended to it.

complete

A callback function to run when the request is complete, regardless of success or failure. The function receives the raw request object and the text status of the request.

context

The scope in which the callback function(s) should run (i.e. what this will mean inside the callback function(s)). By default, this inside the callback function(s) refers to the object originally passed to $.ajax.

data

The data to be sent to the server. This can either be an object or a query string, such asfoo=bar&baz=bim.

dataType

The type of data you expect back from the server. By default, jQuery will look at the MIME type of the response if no dataType is specified.

error

A callback function to run if the request results in an error. The function receives the raw request object and the text status of the request.

jsonp

The callback name to send in a query string when making a JSONP request. Defaults to "callback".

success

A callback function to run if the request succeeds. The function receives the response data (converted to a JavaScript object if the dataType was JSON), as well as the text status of the request and the raw request object.

timeout

The time in milliseconds to wait before considering the request a failure.

traditional

Set to true to use the param serialization style in use prior to jQuery 1.4. For details, seehttp://api.jquery.com/jQuery.param/.

type

The type of the request, "POST" or "GET". Defaults to "GET". Other request types, such as "PUT" and "DELETE" can be used, but they may not be supported by all browsers.

url

The URL for the request.

The url option is the only required property of the $.ajax configuration object; all other properties are optional.

If you don't need the extensive configurability of $.ajax, and you don't care about handling errors, the Ajax convenience functions provided by jQuery can be useful, terse ways to accomplish Ajax requests. These methods are just "wrappers" around the core $.ajax method, and simply pre-set some of the options on the $.ajax method.

The convenience methods provided by jQuery are:

$.get

Perform a GET request to the provided URL.

$.post

Perform a POST request to the provided URL.

$.getScript

Add a script to the page.

$.getJSON

Perform a GET request, and expect JSON to be returned.

In each case, the methods take the following arguments, in order:

url

The URL for the request. Required.

data

The data to be sent to the server. Optional. This can either be an object or a query string, such asfoo=bar&baz=bim.

Note

This option is not valid for $.getScript.

success callback

A callback function to run if the request succeeds. Optional. The function receives the response data (converted to a JavaScript object if the data type was JSON), as well as the text status of the request and the raw request object.

data type

The type of data you expect back from the server. Optional.

Note

This option is only applicable for methods that don't already specify the data type in their name.


jQuery’s ajax capabilities can be especially useful when dealing with forms. The jQuery Form Pluginis a well-tested tool for adding Ajax capabilities to forms, and you should generally use it for handling forms with Ajax rather than trying to roll your own solution for anything remotely complex. That said, there are a two jQuery methods you should know that relate to form processing in jQuery:$.fn.serialize and $.fn.serializeArray.


The notation for creating a typical plugin is as follows:

(function($){
    $.fn.myNewPlugin = function() {
        return this.each(function(){
            // do something
        });
    };
}(jQuery));

Don't let that confuse you though. The point of a jQuery plugin is to extend jQuery's prototype object, and that's what's happening on this line:

$.fn.myNewPlugin = function() { //...

We wrap this assignment in an immediately-invoked function:

(function($){
    //...
}(jQuery));

This has the effect of creating a "private" scope that allows us to extend jQuery using the dollar symbol without having to risk the possibility that the dollar has been over-written by another library.

So our actual plugin, thus far, is this:

$.fn.myNewPlugin = function() {
    return this.each(function(){
        // do something
    });
};

The this keyword within the new plugin refers to the jQuery object on which the plugin is being called.

var somejQueryObject = $('#something');

$.fn.myNewPlugin = function() {
    alert(this === somejQueryObject);
};

somejQueryObject.myNewPlugin(); // alerts 'true'

Your typical jQuery object will contain references to any number of DOM elements, and that's why jQuery objects are often referred to as collections.

So, to do something with a collection we need to loop through it, which is most easily achieved using jQuery's each() method:

$.fn.myNewPlugin = function() {
    return this.each(function(){
    
    });
};

jQuery's each() method, like most other jQuery methods, returns a jQuery object, thus enabling what we've all come to know and love as 'chaining' ($(...).css().attr()...). We wouldn't want to break this convention so we return the this object. Within this loop you can do whatever you want with each element. Here's an example of a small plugin using some of the techniques we've discussed:

(function($){
    $.fn.showLinkLocation = function() {
        return this.filter('a').each(function(){
            $(this).append(
                ' (' + $(this).attr('href') + ')'
            );
        });
    };
}(jQuery));
    
// Usage example:
$('a').showLinkLocation();

This handy plugin goes through all anchors in the collection and appends the href attribute in brackets.

<!-- Before plugin is called: -->
<a href="page.html">Foo</a>
    
<!-- After plugin is called: -->
<a href="page.html">Foo (page.html)</a>

Our plugin can be optimised though:

(function($){
    $.fn.showLinkLocation = function() {
        return this.filter('a').append(function(){
              return ' (' + this.href + ')';
        });
    };
}(jQuery));

We're using the append method's capability to accept a callback, and the return value of that callback will determine what is appended to each element in the collection. Notice also that we're not using the attr method to retrieve the href attribute, because the native DOM API gives us easy access with the aptly named href property.

Here's another example of a plugin. This one doesn't require us to loop through every elememt with the each() method. Instead, we're simply going to delegate to other jQuery methods directly:

(function($){
    $.fn.fadeInAndAddClass = function(duration, className) {
        return this.fadeIn(duration, function(){
            $(this).addClass(className);
        });
    };
}(jQuery));
    
// Usage example:
$('a').fadeInAndAddClass(400, 'finishedFading');

Sometimes you want to make a piece of functionality available throughout your code; for example, perhaps you want a single method you can call on a jQuery selection that performs a series of operations on the selection. In this case, you may want to write a plugin.

Most plugins are simply methods created in the $.fn namespace. jQuery guarantees that a method called on a jQuery object will be able to access that jQuery object as this inside the method. In return, your plugin needs to guarantee that it returns the same object it received, unless explicitly documented otherwise.

Here is an example of a simple plugin:


For more on plugin development, read Mike Alsup's essential post, A Plugin Development Pattern. In it, he creates a plugin called $.fn.hilight, which provides support for the metadata plugin if it's present, and provides a centralized method for setting global and instance options for the plugin.


While most existing jQuery plugins are stateless — that is, we call them on an element and that is the extent of our interaction with the plugin — there’s a large set of functionality that doesn’t fit into the basic plugin pattern.

In order to fill this gap, jQuery UI has implemented a more advanced plugin system. The new system manages state, allows multiple functions to be exposed via a single plugin, and provides various extension points. This system is called the widget factory and is exposed asjQuery.widget as part of jQuery UI 1.8; however, it can be used independently of jQuery UI.

To demonstrate the capabilities of the widget factory, we'll build a simple progress bar plugin.

To start, we’ll create a progress bar that just lets us set the progress once. As we can see below, this is done by calling jQuery.widget with two parameters: the name of the plugin to create and an object literal containing functions to support our plugin. When our plugin gets called, it will create a new plugin instance and all functions will be executed within the context of that instance. This is different from a standard jQuery plugin in two important ways. First, the context is an object, not a DOM element. Second, the context is always a single object, never a collection.


The name of the plugin must contain a namespace; in this case we’ve used the nmk namespace. There is a limitation that namespaces be exactly one level deep — that is, we can't use a namespace like nmk.foo. We can also see that the widget factory has provided two properties for us.this.element is a jQuery object containing exactly one element. If our plugin is called on a jQuery object containing multiple elements, a separate plugin instance will be created for each element, and each instance will have its own this.element. The second property, this.options, is a hash containing key/value pairs for all of our plugin’s options. These options can be passed to our plugin as shown here.

Note

In our example we use the nmk namespace. The ui namespace is reserved for official jQuery UI plugins. When building your own plugins, you should create your own namespace. This makes it clear where the plugin came from and whether it is part of a larger collection.


When we call jQuery.widget it extends jQuery by adding a method to jQuery.fn (the same way we'd create a standard plugin). The name of the function it adds is based on the name you pass to jQuery.widget, without the namespace; in our case it will createjQuery.fn.progressbar. The options passed to our plugin get set in this.options inside of our plugin instance. As shown below, we can specify default values for any of our options. When designing your API, you should figure out the most common use case for your plugin so that you can set appropriate default values and make all options truly optional.


Now that we can initialize our progress bar, we’ll add the ability to perform actions by calling methods on our plugin instance. To define a plugin method, we just include the function in the object literal that we pass to jQuery.widget. We can also define “private” methods by prepending an underscore to the function name.


To call a method on a plugin instance, you pass the name of the method to the jQuery plugin. If you are calling a method that accepts parameters, you simply pass those parameters after the method name.


Note

Executing methods by passing the method name to the same jQuery function that was used to initialize the plugin may seem odd. This is done to prevent pollution of the jQuery namespace while maintaining the ability to chain method calls.

One of the easiest ways to make your plugin extensible is to add callbacks so users can react when the state of your plugin changes. We can see below how to add a callback to our progress bar to signify when the progress has reached 100%. The _trigger method takes three parameters: the name of the callback, a native event object that initiated the callback, and a hash of data relevant to the event. The callback name is the only required parameter, but the others can be very useful for users who want to implement custom functionality on top of your plugin. For example, if we were building a draggable plugin, we could pass the native mousemove event when triggering a drag callback; this would allow users to react to the drag based on the x/y coordinates provided by the event object.


Callback functions are essentially just additional options, so you can get and set them just like any other option. Whenever a callback is executed, a corresponding event is triggered as well. The event type is determined by concatenating the plugin name and the callback name. The callback and event both receive the same two parameters: an event object and a hash of data relevant to the event, as we’ll see below.

If your plugin has functionality that you want to allow the user to prevent, the best way to support this is by creating cancelable callbacks. Users can cancel a callback, or its associated event, the same way they cancel any native event: by calling event.preventDefault() or using return false. If the user cancels the callback, the _trigger method will return false so you can implement the appropriate functionality within your plugin.


Please visit http://github.com/rmurphey/jqfundamentals to contribute!

This chapter covers a number of jQuery and JavaScript best practices, in no particular order. Many of the best practices in this chapter are based on the jQuery Anti-Patterns for Performancepresentation by Paul Irish.

Selector optimization is less important than it used to be, as more browser implementdocument.querySelectorAll() and the burden of selection shifts from jQuery to the browser. However, there are still some tips to keep in midn.

When you move beyond adding simple enhancements to your website with jQuery and start developing full-blown client-side applications, you need to consider how to organize your code. In this chapter, we'll take a look at various code organization patterns you can use in your jQuery application and explore the RequireJS dependency management and build system.

The first step to code organization is separating pieces of your application into distinct pieces; sometimes, even just this effort is sufficient to lend

An object literal is perhaps the simplest way to encapsulate related code. It doesn't offer any privacy for properties or methods, but it's useful for eliminating anonymous functions from your code, centralizing configuration options, and easing the path to reuse and refactoring.


The object literal above is simply an object assigned to a variable. The object has one property and several methods. All of the properties and methods are public, so any part of your application can see the properties and call methods on the object. While there is an init method, there's nothing requiring that it be called before the object is functional.

How would we apply this pattern to jQuery code? Let's say that we had this code written in the traditional jQuery style:

// clicking on a list item loads some content
// using the list item's ID and hides content
// in sibling list items
$(document).ready(function() {
  $('#myFeature li')
    .append('<div/>')
    .click(function() {
      var $this = $(this);
      var $div = $this.find('div');
      $div.load('foo.php?item=' +
        $this.attr('id'), 
        function() {
          $div.show();
          $this.siblings()
            .find('div').hide();
        }
      );
    });
});

If this were the extent of our application, leaving it as-is would be fine. On the other hand, if this was a piece of a larger application, we'd do well to keep this functionality separate from unrelated functionality. We might also want to move the URL out of the code and into a configuration area. Finally, we might want to break up the chain to make it easier to modify pieces of the functionality later.


The first thing you'll notice is that this approach is obviously far longer than the original — again, if this were the extent of our application, using an object literal would likely be overkill. Assuming it's not the extent of our application, though, we've gained several things:

  • We've broken our feature up into tiny methods. In the future, if we want to change how content is shown, it's clear where to change it. In the original code, this step is much harder to locate.

  • We've eliminated the use of anonymous functions.

  • We've moved configuration options out of the body of the code and put them in a central location.

  • We've eliminated the constraints of the chain, making the code easier to refactor, remix, and rearrange.

For non-trivial features, object literals are a clear improvement over a long stretch of code stuffed in a $(document).ready() block, as they get us thinking about the pieces of our functionality. However, they aren't a whole lot more advanced than simply having a bunch of function declarations inside of that $(document).ready() block.

The module pattern overcomes some of the limitations of the object literal, offering privacy for variables and functions while exposing a public API if desired.


In the example above, we self-execute an anonymous function that returns an object. Inside of the function, we define some variables. Because the variables are defined inside of the function, we don't have access to them outside of the function unless we put them in the return object. This means that no code outside of the function has access to the privateThing variable or to thechangePrivateThing function. However, sayPrivateThing does have access toprivateThing and changePrivateThing, because both were defined in the same scope assayPrivateThing.

This pattern is powerful because, as you can gather from the variable names, it can give you private variables and functions while exposing a limited API consisting of the returned object's properties and methods.

Below is a revised version of the previous example, showing how we could create the same feature using the module pattern while only exposing one public method of the module,showItemByIndex().


When a project reaches a certain size, managing the script modules for a project starts to get tricky. You need to be sure to sequence the scripts in the right order, and you need to start seriously thinking about combining scripts together into a bundle for deployment, so that only one or a very small number of requests are made to load the scripts. You may also want to load code on the fly, after page load.

RequireJS, a dependency management tool by James Burke, can help you manage the script modules, load them in the right order, and make it easy to combine the scripts later via the RequireJS optimization tool without needing to change your markup. It also gives you an easy way to load scripts after the page has loaded, allowing you to spread out the download size over time.

RequireJS has a module system that lets you define well-scoped modules, but you do not have to follow that system to get the benefits of dependency management and build-time optimizations. Over time, if you start to create more modular code that needs to be reused in a few places, the module format for RequireJS makes it easy to write encapsulated code that can be loaded on the fly. It can grow with you, particularly if you want to incorporate internationalization (i18n) string bundles, to localize your project for different languages, or load some HTML strings and make sure those strings are available before executing code, or even use JSONP services as dependencies.

The easiest way to use RequireJS with jQuery is to download a build of jQuery that has RequireJS built in. This build excludes portions of RequireJS that duplicate jQuery functionality. You may also find it useful to download a sample jQuery project that uses RequireJS.

Using RequireJS in your page is simple: just include the jQuery that has RequireJS built in, then require your application files. The following example assumes that the jQuery build, and your other scripts, are all in a scripts/ directory.


The call to require(["app"]) tells RequireJS to load the scripts/app.js file. RequireJS will load any dependency that is passed to require() without a .js extension from the same directory as require-jquery.js, though this can be configured to behave differently. If you feel more comfortable specifying the whole path, you can also do the following:

<script>require(["scripts/app.js"]);</script>

What is in app.js? Another call to require.js to load all the scripts you need and any init work you want to do for the page. This example app.js script loads two plugins, jquery.alpha.jsand jquery.beta.js (not the names of real plugins, just an example). The plugins should be in the same directory as require-jquery.js:


RequireJS makes it easy to define reusable modules via require.def(). A RequireJS module can have dependencies that can be used to define a module, and a RequireJS module can return a value — an object, a function, whatever — that can then be consumed by yet other modules.

If your module does not have any dependencies, then just specify the name of the module as the first argument to require.def(). The second argument is just an object literal that defines the module's properties. For example:

Example 10.7. Defining a RequireJS module that has no dependencies

require.def("my/simpleshirt",
    {
        color: "black",
        size: "unisize"
    }
);

This example would be stored in a my/simpleshirt.js file.

If your module has dependencies, you can specify the dependencies as the second argument torequire.def() (as an array) and then pass a function as the third argument. The function will be called to define the module once all dependencies have loaded. The function receives the values returned by the dependencies as its arguments (in the same order they were required in the array), and the function should return an object that defines the module.


In this example, a my/shirt module is created. It depends on my/cart and my/inventory. On disk, the files are structured like this:

my/cart.js
my/inventory.js
my/shirt.js

The function that defines my/shirt is not called until the my/cart and my/inventorymodules have been loaded, and the function receives the modules as the cart and inventoryarguments. The order of the function arguments must match the order in which the dependencies were required in the dependencies array. The object returned by the function call defines the my/shirt module. Be defining modules in this way, my/shirt does not exist as a global object. Modules that define globals are explicitly discouraged, so multiple versions of a module can exist in a page at a time.

Modules do not have to return objects; any valid return value from a function is allowed.


Only one module should be required per JavaScript file.


Once you incorporate RequireJS for dependency management, your page is set up to be optimized very easily. Download the RequireJS source and place it anywhere you like, preferrably somewhere outside your web development area. For the purposes of this example, the RequireJS source is placed as a sibling to the webapp directory, which contains the HTML page and the scripts directory with all the scripts. Complete directory structure:

requirejs/ (used for the build tools)
webapp/app.html
webapp/scripts/app.js
webapp/scripts/require-jquery.js
webapp/scripts/jquery.alpha.js
webapp/scripts/jquery.beta.js

Then, in the scripts directory that has require-jquery.js and app.js, create a file called app.build.js with the following contents:


To use the build tool, you need Java 6 installed. Closure Compiler is used for the JavaScript minification step (if optimize: "none" is commented out), and it requires Java 6.

To start the build, go to the webapp/scripts directory, execute the following command:

# non-windows systems
../../requirejs/build/build.sh app.build.js

# windows systems
..\..\requirejs\build\build.bat app.build.js

Now, in the webapp-build directory, app.js will have the app.js contents, jquery.alpha.jsand jquery.beta.js inlined. If you then load the app.html file in the webapp-builddirectory, you should not see any network requests for jquery.alpha.js andjquery.beta.js.

We’re all familiar with the basic events — click, mouseover, focus, blur, submit, etc. — that we can latch on to as a user interacts with the browser. Custom events open up a whole new world of event-driven programming. In this chapter, we’ll use jQuery’s custom events system to make a simple Twitter search application.

It can be difficult at first to understand why you'd want to use custom events, when the built-in events seem to suit your needs just fine. It turns out that custom events offer a whole new way of thinking about event-driven JavaScript. Instead of focusing on the element that triggers an action, custom events put the spotlight on the element being acted upon. This brings a bevy of benefits, including:

  • Behaviors of the target element can easily be triggered by different elements using the same code.

  • Behaviors can be triggered across multiple, similar, target elements at once.

  • Behaviors are more clearly associated with the target element in code, making code easier to read and maintain.

Why should you care? An example is probably the best way to explain. Suppose you have a lightbulb in a room in a house. The lightbulb is currently turned on, and it’s controlled by two three-way switches and a clapper:

<div class="room" id="kitchen">
    <div class="lightbulb on"></div>
    <div class="switch"></div>
    <div class="switch"></div>
    <div class="clapper"></div>
</div>

Triggering the clapper or either of the switches will change the state of the lightbulb. The switches and the clapper don’t care what state the lightbulb is in; they just want to change the state.

Without custom events, you might write some code like this:

$('.switch, .clapper').click(function() {
    var $light = $(this).parent().find('.lightbulb');
    if ($light.hasClass('on')) {
        $light.removeClass('on').addClass('off');
    } else {
        $light.removeClass('off').addClass('on');
    }
});

With custom events, your code might look more like this:

$('.lightbulb').bind('changeState', function(e) {
    var $light = $(this);
    if ($light.hasClass('on')) {
        $light.removeClass('on').addClass('off');
    } else {
        $light.removeClass('off').addClass('on');
    }
});

$('.switch, .clapper').click(function() { 
    $(this).parent().find('.lightbulb').trigger('changeState');
});

This last bit of code is not that exciting, but something important has happened: we’ve moved the behavior of the lightbulb to the lightbulb, and away from the switches and the clapper.

Let’s make our example a little more interesting. We’ll add another room to our house, along with a master switch, as shown here:

<div class="room" id="kitchen">
    <div class="lightbulb on"></div>
    <div class="switch"></div>
    <div class="switch"></div>
    <div class="clapper"></div>
</div>
<div class="room" id="bedroom">
    <div class="lightbulb on"></div>
    <div class="switch"></div>
    <div class="switch"></div>
    <div class="clapper"></div>
</div>
<div id="master_switch"></div>

If there are any lights on in the house, we want the master switch to turn all the lights off; otherwise, we want it to turn all lights on. To accomplish this, we’ll add two more custom events to the lightbulbs: turnOn and turnOff. We’ll make use of them in the changeState custom event, and use some logic to decide which one the master switch should trigger:

$('.lightbulb')
    .bind('changeState', function(e) {
        var $light = $(this);
        if ($light.hasClass('on')) {
            $light.trigger('turnOff');
        } else {
            $light.trigger('turnOn');
        }
    })
    .bind('turnOn', function(e) {
        $(this).removeClass('off').addClass('on');
    })
    .bind('turnOff', function(e) {
        $(this).removeClass('off').addClass('on');
    });
 
$('.switch, .clapper').click(function() { 
    $(this).parent().find('.lightbulb').trigger('changeState');
});
 
$('#master_switch').click(function() {
    if ($('.lightbulb.on').length) {
        $('.lightbulb').trigger('turnOff');
    } else {
        $('.lightbulb').trigger('turnOn');
    }
});

Note how the behavior of the master switch is attached to the master switch; the behavior of a lightbulb belongs to the lightbulbs.

Note

If you’re accustomed to object-oriented programming, you may find it useful to think of custom events as methods of objects. Loosely speaking, the object to which the method belongs is created via the jQuery selector. Binding the changeState custom event to all $(‘.light’) elements is akin to having a class called Light with a method of changeState, and then instantiating newLight objects for each element with a classname of light.

To demonstrate the power of custom events, we’re going to create a simple tool for searching Twitter. The tool will offer several ways for a user to add search terms to the display: by entering a search term in a text box, by entering multiple search terms in the URL, and by querying Twitter for trending terms.

The results for each term will be shown in a results container; these containers will be able to be expanded, collapsed, refreshed, and removed, either individually or all at once.

When we’re done, it will look like this:


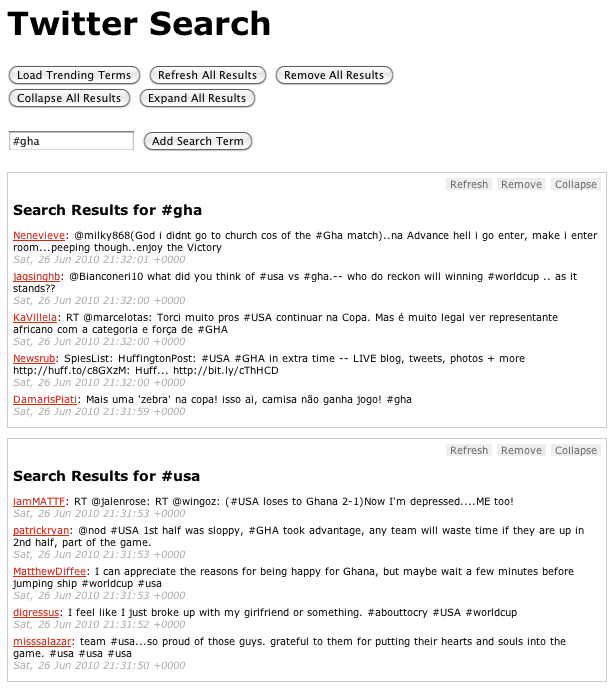
We’ll start with some basic HTML:

<h1>Twitter Search</h1>
<input type="button" id="get_trends" 
    value="Load Trending Terms" />
 
<form>
    <input type="text" class="input_text" 
        id="search_term" />
    <input type="submit" class="input_submit" 
        value="Add Search Term" />
</form>
 
<div id="twitter">
    <div class="template results">
        <h2>Search Results for 
        <span class="search_term"></span></h2>
    </div>
</div>

This gives us a container (#twitter) for our widget, a template for our results containers (hidden via CSS), and a simple form where users can input a search term. (For the sake of simplicity, we’re going to assume that our application is JavaScript-only and that our users will always have CSS.)

There are two types of objects we’ll want to act on: the results containers, and the Twitter container.

The results containers are the heart of the application. We’ll create a plugin that will prepare each results container once it’s added to the Twitter container. Among other things, it will bind the custom events for each container and add the action buttons at the top right of each container. Each results container will have the following custom events:

refresh

Mark the container as being in the “refreshing” state, and fire the request to fetch the data for the search term.

populate

Receive the returned JSON data and use it to populate the container.

remove

Remove the container from the page after the user verifies the request to do so. Verification can be bypassed by passing true as the second argument to the event handler. The remove event also removes the term associated with the results container from the global object containing the search terms.

collapse

Add a class of collapsed to the container, which will hide the results via CSS. It will also turn the container’s “Collapse” button into an “Expand” button.

expand

Remove the collapsed class from the container. It will also turn the container’s “Expand” button into a “Collapse” button.

The plugin is also responsible for adding the action buttons to the container. It binds a click event to each action’s list item, and uses the list item’s class to determine which custom event will be triggered on the corresponding results container.

$.fn.twitterResult = function(settings) {
    return $(this).each(function() {
        var $results = $(this),
            $actions = $.fn.twitterResult.actions = 
                $.fn.twitterResult.actions || 
                $.fn.twitterResult.createActions(),
            $a = $actions.clone().prependTo($results),
            term = settings.term;

        $results.find('span.search_term').text(term);

        $.each(
            ['refresh', 'populate', 'remove', 'collapse', 'expand'], 
            function(i, ev) { 
                $results.bind(
                    ev, 
                    { term : term },
                    $.fn.twitterResult.events[ev]
                ); 
            }
        );

        // use the class of each action to figure out 
        // which event it will trigger on the results panel
        $a.find('li').click(function() {
            // pass the li that was clicked to the function
            // so it can be manipulated if needed
            $results.trigger($(this).attr('class'), [ $(this) ]);
        });
    });
};

$.fn.twitterResult.createActions = function() {
    return $('<ul class="actions" />').append(
        '<li class="refresh">Refresh</li>' +
        '<li class="remove">Remove</li>' +
        '<li class="collapse">Collapse</li>'
    );
};

$.fn.twitterResult.events = {
    refresh : function(e) {
           // indicate that the results are refreshing
        var $this = $(this).addClass('refreshing');

        $this.find('p.tweet').remove();
        $results.append('<p class="loading">Loading ...</p>');

        // get the twitter data using jsonp
        $.getJSON(
            'http://search.twitter.com/search.json?q=' +                     
                escape(e.data.term) + '&rpp=5&callback=?', 
            function(json) { 
                $this.trigger('populate', [ json ]); 
            }
        );
    },

    populate : function(e, json) {
        var results = json.results;
        var $this = $(this);

        $this.find('p.loading').remove();

        $.each(results, function(i,result) {
            var tweet = '<p class="tweet">' + 
                '<a href="http://twitter.com/' + 
                result.from_user + 
                '">' +
                result.from_user + 
                '</a>: ' +
                result.text + 
                ' <span class="date">' + 
                result.created_at + 
                '</span>' +
            '</p>';
            $this.append(tweet);
        });

        // indicate that the results 
        // are done refreshing
        $this.removeClass('refreshing');
    },

    remove : function(e, force) {
        if (
            !force &&     
            !confirm('Remove panel for term ' + e.data.term + '?')
        ) {
            return;
        }
        $(this).remove();

        // indicate that we no longer 
        // have a panel for the term
        search_terms[e.data.term] = 0;
    },

    collapse : function(e) {
        $(this).find('li.collapse').removeClass('collapse')
            .addClass('expand').text('Expand');

        $(this).addClass('collapsed');
    },

    expand : function(e) {
        $(this).find('li.expand').removeClass('expand')
            .addClass('collapse').text('Collapse');

        $(this).removeClass('collapsed');
    }
};

The Twitter container itself will have just two custom events:

getResults

Receives a search term and checks to determine whether there’s already a results container for the term; if not, adds a results container using the results template, set up the results container using the $.fn.twitterResult plugin discussed above, and then triggers the refresh event on the results container in order to actually load the results. Finally, it will store the search term so the application knows not to re-fetch the term.

getTrends

Queries Twitter for the top 10 trending terms, then iterates over them and triggers thegetResults event for each of them, thereby adding a results container for each term.

Here's how the Twitter container bindings look:

$('#twitter')
    .bind('getResults', function(e, term) {
        // make sure we don't have a box for this term already
        if (!search_terms[term]) { 
            var $this = $(this);
            var $template = $this.find('div.template');

            // make a copy of the template div
            // and insert it as the first results box
            $results = $template.clone().
                removeClass('template').
                insertBefore($this.find('div:first')).
                twitterResult({
                    'term' : term
                });

            // load the content using the "refresh" 
            // custom event that we bound to the results container
            $results.trigger('refresh');
            search_terms[term] = 1;
        }
    })
    .bind('getTrends', function(e) {
        var $this = $(this);
        $.getJSON('http://search.twitter.com/trends.json?callback=?', function(json) {
                var trends = json.trends; 
                $.each(trends, function(i, trend) {
                    $this.trigger('getResults', [ trend.name ]);
                });
            });
    });

So far, we’ve written a lot of code that does approximately nothing, but that’s OK. By specifying all the behaviors that we want our core objects to have, we’ve created a solid framework for rapidly building out the interface.

Let’s start by hooking up our text input and the “Load Trending Terms” button. For the text input, we’ll capture the term that was entered in the input and pass it as we trigger the Twitter container’sgetResults event. Clicking the “Load Trending Terms” will trigger the Twitter container’sgetTrends event:

$('form').submit(function(e) {
    e.preventDefault();
    var term = $('#search_term').val();
    $('#twitter').trigger('getResults', [ term ]);
});

$('#get_trends').click(function() {
    $('#twitter').trigger('getTrends'); 
});

By adding a few buttons with the appropriate IDs, we can make it possible to remove, collapse, expand, and refresh all results containers at once, as shown below. For the remove button, note how we’re passing a value of true to the event handler as its second argument, telling the event handler that we don’t want to verify the removal of individual containers.

$.each(['refresh', 'expand', 'collapse'], function(i, ev) {
    $('#' + ev).click(function(e) { $('#twitter div.results').trigger(ev); });
});

$('#remove').click(function(e) {
    if (confirm('Remove all results?')) {
        $('#twitter div.results').trigger('remove', [ true ]);
    }
});


[정리] 소셜 플랫폼

프로그래밍/읽을거리 2010. 10. 5. 14:54 Posted by galad
MS오피스 :
  문서 작업 기능을 서비스하는 소프트웨어. Software as a Service(SaaS).

윈도우즈 :
  MS오피스라는 서비스를 제공하는 플랫폼. MS는 윈도우즈용 SDK를 제공하여 다른 회사들이 윈도우즈 플랫폼에서 돌아가는 소프트웨어, 즉 서비스를 만들 수 있도록 함. 그 결과 다양한 앱(서비스)는 윈도우즈 플랫폼의 경쟁력을 강화시키고 플랫폼 자체의 판매를 늘림. 서비스 플랫폼.

클라우드 시대의 서비스 플랫폼 전략 :
  킬러 앱 성격의 서비스를 기본으로 제공해 고객을 모으고, 그 고객 기반을 제공하는 서비스 플랫폼을 Open API로 개방하여 개방형 플랫폼을 생성.

플랫폼 :
  응용 프로그램이 실행될 수 있는 기초를 이루는 컴퓨터 시스템.
  소프트웨어가 구동 가능한 하드웨어 아키텍처나 소프트웨어 프레임워크의 여러 종류를 설명하는 단어.
  다른 기술들 또는 공정들이 그 위에서 구현될 수 있는 일종의 기술 기반.

결국 서비스 플랫폼이란 서비스를 제공하기 위한 기반이 되는 플랫폼을 의미하고, 그 서비스가 소셜이면 소셜 서비스를 제공하기 위한 플랫폼을 의미(소셜 플랫폼).

Daum의 개방형 소셜 플랫폼 지향이란, 결국 개방형 소셜 서비스를 제공하는 플랫폼을 목표로 하겠다는 얘기.
Daum 내에서 개방형 소셜 서비스들, 트위터, 미투데이, 페이스북 등을 통합해서(?) 제공하겠다는 듯.

대충 이 정도로 서비스와 플랫폼, 소셜 플랫폼에 대해서 정리해 보았음.

[java] zip 파일 압축풀기

프로그래밍/Java 2010. 9. 28. 20:07 Posted by galad
    /**
     * 넘겨받은 zip파일이 위치한 디렉토리에 zip 파일을 풀고, zip파일 내의 파일 목록(파일명)을 반환한다.
     * @param zipFilePath
     * @return zip파일에 들어있던 파일path 목록
     * @throws IOException
     */
    public static List<String> unzip(File file) throws IOException {

        List<String> fileList = new ArrayList<String>();

        // zip 파일 압축 해제
        ZipFile zipFile = new ZipFile(file,"EUC-KR");
        Enumeration entries = zipFile.getEntries();

        String zipFilePath = file.getPath();
        String orgDirPath = zipFilePath.substring(0, zipFilePath.lastIndexOf(File.separator));

        while(entries.hasMoreElements()) {

            ZipEntry zipEntry = (ZipEntry)entries.nextElement();
            String entryFileName = zipEntry.getName();

            System.out.println("File in Zip = " + entryFileName);

            if(zipEntry.isDirectory()) {
                (new File(orgDirPath + File.separator + entryFileName)).mkdir(); // 디렉토리 생성
                continue;
            }
            else {

                String[] tmpSplit = null; // 폴더 채로 압축하면, 폴더 내의 파일명은 [폴더명/폴더명/파일명] 이런 식으로 됨.

                try
                {
                    tmpSplit   = entryFileName.split(File.separator);
                }
                catch(Exception e)
                {
//                    tmpSplit = entryFileName.split("\\\\");
                    tmpSplit = entryFileName.split("/");
                }

                if(tmpSplit.length > 1)
                {
                    String tmpDir = "";
                    for(int j = 0; j < tmpSplit.length - 1; j++) // 파일이 여러 depth의 폴더 내에 있는 경우. 폴더/폴더/폴더/파일
                        tmpDir += (tmpSplit[j] + File.separator); // 상위의 모든 폴더명 붙이기

                    tmpDir = orgDirPath + File.separator + tmpDir; // zip 파일이 위치한 디렉토리에 압축된 디렉토리 생성

                    File tmpFile = new File(tmpDir);
                    if(!tmpFile.exists())
                        tmpFile.mkdir();
                }

                // 대상 파일
                String targetFilePath = orgDirPath + File.separator + entryFileName;

                // 파일 복사
                copyInputStream(zipFile.getInputStream(zipEntry), new BufferedOutputStream(new FileOutputStream(targetFilePath)));
//                System.out.println("FILE [" + entryFileName + "] COPIED TO " + orgDirPath);

                fileList.add(entryFileName);
            }
        }

        if(zipFile != null) // 열은 zip 파일 닫기
            zipFile.close();

        return fileList;
    }

    /**
     * 파일을 stream으로 읽어들여 대상 outputStream에 복사하는 메소드
     * @param in
     * @param out
     * @throws IOException
     */
    private static final void copyInputStream(InputStream in, OutputStream out) throws IOException
    {
        byte[] buffer = new byte[1024];
        int len;

        while ((len = in.read(buffer)) >= 0)
            out.write(buffer, 0, len);

        in.close();
        out.close();
    }


'프로그래밍 > Java' 카테고리의 다른 글

[zip] 압축하기2  (0) 2010.10.08
[zip] zip 압축하기/압축풀기  (0) 2010.10.08
[java] String, StringBuffer, StringBuilder  (0) 2010.09.28
[junit] 멀티스레드 테스트  (0) 2010.09.27
[jar] jar 압축하기/해제하기  (0) 2010.09.10
참고: http://cacky.tistory.com/36
http://iolothebard.tistory.com/291

일단, StringBuffer랑 StringBuilder

StringBuffer와 StringBuilder의 유일한 차이점은, StringBuffer가 동기화(synchronized)되고, StringBuilder는 동기화되지 않는(unsynchronized) 란다.
따라서, 프로그램이 단일 쓰레드 환경(single thread)에서 동작해야 한다면 StringBuilder를 쓰는 것이 StringBuffer보다 더 효율적(efficient)이다.

자세한 것은 링크 참조...

[junit] 멀티스레드 테스트

프로그래밍/Java 2010. 9. 27. 11:40 Posted by galad
참조: http://devyongsik.tistory.com/263
http://today.java.net/pub/a/today/2003/08/06/multithreadedTests.html

보통은 스레드가 다 돌기 전에 junit 테스트가 끝나버림.
groboutils 이라는 라이브러리 사용해서 멀티스레드 테스트 가능.

public class Tester extends TestRunnable { //net.sourceforge.groboutils.junit.v1.TestRunnable를 상속 
    private Log logger = LogFactory.getLog(Tester.class); 
 
    int i = 0; 
 
    public Tester(int i ) { 
        this.i = i; 
    } 
 
    @Override 
    public void runTest() { //net.sourceforge.groboutils.junit.v1.TestRunnable의 runTest메서드를 오버라이드 
                //이 메서드는 Runnable의 run 메서드가 해야 할 일이 들어갑니다. 
        try { 
            Thread.sleep(1000); 
        } catch (InterruptedException e) { 
            // TODO Auto-generated catch block 
            e.printStackTrace(); 
        } 
 
        System.out.println(Thread.currentThread().getName() + " : [" + i + "]"); 
    } 


public class TestThread extends TestCase { 
    private Log logger = LogFactory.getLog(TestThread.class); 
 
    @Test 
    public void testM() throws Throwable { 
        TestRunnable[] t = new TestRunnable[20]; //TestRunnable로 배열을 만들고 
 
        for(int index = 0; index < 20; index++) { 
            t[index] = new Tester(index); //TestRunnable을 상속한 Runnable의 run 메서드를 테스트 할 클래스를 넣습니다. 
        } 
 
        MultiThreadedTestRunner mttr = new MultiThreadedTestRunner(t); //이렇게 생성하고 
        mttr.runTestRunnables(); //이렇게 테스트 합니다. 
 
        System.out.println("main end........................."); 
    } 


위와 같이 하면 된다는데, 길고 복잡해서 그냥 스레드 돌리고 밑에다가 sleep 줘버렸음 ㅡ.ㅡ;;;

[oracle] SELECT 를 사용한 UPDATE 3

프로그래밍/DB 2010. 9. 14. 14:42 Posted by galad
UPDATE /*+ bypass_ujvc */
(
    SELECT
        CONTENT_ID,
        HDV_YN,
        META18 AS META_HDV_YN
    FROM
    (
        SELECT
            A.CONTENT_ID
            ,CASE
                WHEN COUNT(B.META02) > 0 THEN 'Y'
                ELSE 'N'
            END AS HDV_YN
            ,C.META18
        FROM
            SUB_CONTENT_META A, SUB_CONTENT_META_EXTEND B, CONTENT_META_EXTEND C
        WHERE
            A.SUB_CONTENT_ID = B.SUB_CONTENT_ID
            AND A.CONTENT_ID = C.CONTENT_ID
            AND B.META02 = 'PD009703'
    --        AND    A.CONTENT_ID = ''
        GROUP BY
            A.CONTENT_ID, C.META18
    )
)
SET META_HDV_YN = HDV_YN

CONTENT_META_EXTEND 의 컬럼을 업데이트하고 싶은데 위와 같이 안쪽(?)에서 뷰를 만들 때 같이 조인해버리면
"가상 열은 사용할 수 없습니다" 라는 에러가 난다.

아래처럼 실제 데이터 넣을 컬럼은 가장 외부로 뺄 것
참고: http://database.sarang.net/?inc=read&aid=35544&criteria=oracle&subcrit=&id=36136&limit=20&keyword=&page=50

[가상 Table에 정보를 저장(Insert) 하거나 변경(update)를 수행할 수 없지요

즉, UPDATE (SELECT....)

SELECT 부분이 실 Table이어야만 하지 Select된 결과에 대한 것은 변경이나 저장을

할 수 없는 것이지요.

따라서 Select 부분을 조건절로 보내고, 실 Table을 정의하시면 됩니다.]


UPDATE /*+ bypass_ujvc */
(
    SELECT
        T.CONTENT_ID,
        T.HDV_YN,
        C.META18 AS META_HDV_YN
    FROM
    (
        SELECT
            A.CONTENT_ID
            ,CASE
                WHEN COUNT(B.META02) > 0 THEN 'Y'
                ELSE 'N'
            END AS HDV_YN
        FROM
            SUB_CONTENT_META A, SUB_CONTENT_META_EXTEND B
        WHERE
            A.SUB_CONTENT_ID = B.SUB_CONTENT_ID
            AND B.META02 = 'PD009703'
            AND    A.CONTENT_ID = '0000024061'
        GROUP BY
            A.CONTENT_ID
    ) T, CONTENT_META_EXTEND C
    WHERE
        T.CONTENT_ID = C.CONTENT_ID
)
SET META_HDV_YN = HDV_YN;


'프로그래밍 > DB' 카테고리의 다른 글

[oracle] Windows 7 과 oracle, Toad  (0) 2011.03.09
[Tool] 토드 폰트 변경하기  (0) 2010.11.19
[oracle] select 문을 이용한 update 2  (0) 2010.08.16
[SQLite] Command Line Shell For SQLite  (0) 2010.05.24
[SQLite] Quick Start  (1) 2010.05.24

[jar] jar 압축하기/해제하기

프로그래밍/Java 2010. 9. 10. 16:40 Posted by galad
- JAR 파일 만들기
   jar cvf 만들파일명.jar *.*


- JAR 파일 업데이트
   jar uvf 만들파일명.jar *.*


- JAR 파일 풀기
   jar xvf 압축풀파일명.jar *.*
참고: http://www.yunsobi.com/tt/subby/99
참고: http://decoder.tistory.com/37

첨부된 파일은 검색에서 나온 것으로 문제 있으면 삭제하겠습니다.

package com.omp.bp.cms.batchreg.service;

import java.io.File;
import java.io.FileOutputStream;
import java.io.IOException;

import org.apache.log4j.Logger;
import org.jdom.Document;
import org.jdom.Element;
import org.jdom.output.XMLOutputter;

import com.omp.bp.cms.batchreg.BatchRegisterErrorConstants;
import com.omp.bp.cms.util.DateUtil;

/**
 * 배치 등록 관련 에러 로그 처리 클래스. 콘텐츠 하나에 대한 에러로그XML 생성.
 * @author Sung,HongJe
 *
 */
public class BatchRegisterError {

    private final static Logger log = Logger.getLogger(BatchRegisterError.class);

    private final String ERROR_FILE_NAME_HEADER = "ERROR_";
    private final String ERROR_FILE_EXT = "XML";

    /**
     * 에러 로그 파일 생성
     * @param ftpRepoPath ftp 디렉토리 패스
     * @param contentId 콘텐츠ID
     * @param contentType 콘텐츠타입 - C:채널, E:콘텐츠(에피소드)
     * @param errorCode 에러코드
     * @throws IOException
     */
    public void makeErrorLog(String ftpRepoPath, String contentId, String contentType, int errorCode) throws IOException {

        // 1. ERROR 파일패스 설정 : ftpRepo/ERROR_[TYPE]_[CID].XML
        // 2. 에러 코드를 이용해서 XML 내용 설정
        // 3. 파일로 저장

        // ftpRepo/ERROR_C_000050151.XML
        String filePath = ftpRepoPath + File.separator + ERROR_FILE_NAME_HEADER + contentType.toUpperCase() + "_" + contentId + "." + ERROR_FILE_EXT;
        String errorMsg = BatchRegisterErrorConstants.getErrorMsg(errorCode);

        // XML 내용 생성
        Document xmlDoc = makeErrorXML(contentId, errorCode, errorMsg, DateUtil.getToday() + DateUtil.getTime());

        File file = new File(filePath);
        FileOutputStream out = null;

        try {

            if(!file.exists()) { // 로그 파일 없으면 생성

                File dir = new File(ftpRepoPath); // ftp 디렉토리가 없으면 생성
                if(!dir.exists())
                    dir.mkdir();

                file.createNewFile();
            }

            out = new FileOutputStream(file);
            XMLOutputter serializer = new XMLOutputter();
            serializer.output(xmlDoc, out);
            out.flush();
        }
        catch (IOException e) {

            log.error("BatchRegisterError.makeErrorLog 로그 파일 작성 중 예외 발생", e);
            throw e;
        }
        finally {

            if(out != null) {

                try {

                    out.close();
                }
                catch (IOException e) {

                    log.error("BatchRegisterError.makeErrorLog 로그 파일 작성 종료 중 예외 발생", e);
                }
            }
        }
    }

    /**
     * 에러 메시지를 담는 XML을 생성 후 반환
     * @param contentId
     * @param errorCode
     * @param errorMsg
     * @param dateTime
     * @return
     */
    private Document makeErrorXML(String contentId, int errorCode, String errorMsg, String dateTime) {

        Document doc = new Document();

        Element error_log = new Element("error_log"); // root

        Element content_id = new Element("content_id");
        content_id.setAttribute("id", contentId); // set CID

        Element msg = new Element("msg");
        msg.setText(errorMsg);

        Element code = new Element("code");
        code.setText(String.valueOf(errorCode));

        Element time = new Element("time");
        time.setText(DateUtil.getToday() + DateUtil.getTime());

        content_id.addContent(msg);
        content_id.addContent(code);
        content_id.addContent(time);

        error_log.addContent(content_id);

        doc.addContent(error_log);

        return doc;
    }
}


볼드체를 참고하기

java.util.concurrent 패키지
- 일반 자바 Thread 클래스보다 높은 수준의 동시성 프로그래밍을 지원한다...고 함.
- ExecutorService 클래스는 하나 이상의 스레드를 관리하며, 작업(Runnable이나 Callable 인스턴스)이 실행되도록 실행기(ExecutorService 인스턴스)에 넘겨주면 된다.
  그러면 Future 클래스의 인스턴스를 반환되는데, 이 Future클래스는 실행시킨 작업이 반환할, 아직 알 수 없는 값을 참조한다.
 (1) transThread = Executors.newSingleThreadExecutor(); // 실행기 얻기
 (2) transPending = transThread.submit(translateTask); // ExecutorService에 작업(translateTask 쓰레드)를 넘기고 결과를 Future(transPending)로 받음.

외부 스레드에서 Android GUI 스레드의 유저 인터페이스 업데이트 하기
   /**
     * 화면의 텍스트 수정하기(다른 스레드에서 호출됨)
     * @param text
     */
    public void setTranslated(String text) {

        guiSetText(transText, text);
    }

    /**
     * 화면의 텍스트 수정하기(다른 스레드에서 호출됨)
     * @param text
     */
    public void setRetranslated(String text) {

        guiSetText(retransText, text);
    }

   /**
     * GUI 관련한 변경은 모두 GUI스레드에서 이루어져야 한다.<br>
     * 외부 스레드(유저 인터페이스가 아닌)에서 유저 인터페이스 관련 함수를 호출할 수 없음. 외부 스레드에서 GUI스레드에게 유저 인터페이스를 업데이트하라고 요청.
     * @param view
     * @param text
     */
    private void guiSetText(final TextView view, final String text) {

        guiThread.post(new Runnable() {

            @Override
            public void run() {

                view.setText(text);
            }
        });
    }
setTranslated(), setRetranslated() 메소드가 외부 스레드에서 불림 -> guiSetText() 메소드가 실행됨. -> 유저 인터페이스 업데이트

'프로그래밍 > Android' 카테고리의 다른 글

[TDD] 안드로이드 TDD 개발하기  (0) 2010.11.15
[Hello,Android] Android <-> WebView 간 호출하기  (1) 2010.08.31
[Hello,World] Sudoku  (0) 2010.08.31
[Hello,Android] Audio, Video  (0) 2010.08.30
[tip] LogCat 문자깨짐  (0) 2010.08.18
Android쪽
public class LocalBrowser extends Activity {

    private static final String TAG = "LocalBrowser";
    private final Handler handler = new Handler();
    private WebView webView;
    private TextView textView;
    private Button button;

    /** Called when the activity is first created. */
    @Override
    public void onCreate(Bundle savedInstanceState) {
        super.onCreate(savedInstanceState);
        setContentView(R.layout.main);

        // 화면에서 안드로이드 컨트롤 찾기
        webView = (WebView) findViewById(R.id.web_view);
        textView = (TextView) findViewById(R.id.text_view);
        button = (Button) findViewById(R.id.button);

        // 임베딩된 브라우저-WebView-에 자바스크립트 활성화하기
        webView.getSettings().setJavaScriptEnabled(true);

        // 자바 객체-AndroidBridge-를 브라우저의 자바 스크립트에 노출시키기
        // 객체, 노출할 DOM명칭
        webView.addJavascriptInterface(new AndroidBridge(), "android");

        // 임의의 WebChromeClient 객체를 생성하여 WebView에 등록.
        // 여기의 Chrome은 브라우저 창 주의를 정리하는 모든 작업을 일컬음. 즉, 브라우저 처리을 할 클라이언트를 등록
        webView.setWebChromeClient(new WebChromeClient() {

            @Override
            public boolean onJsAlert(WebView view, String url, String message, JsResult result) {
//                return super.onJsAlert(view, url, message, result);
                Log.d(TAG, "onJsAlert(" + view + ", " + url + ", " + message + ", " + result + ")");

                Toast.makeText(LocalBrowser.this, message, 3000).show();

                result.confirm(); // 결과 처리됨
                return true; // 여기서 처리했으므로 true 반환
            }
        });

        // 로컬 assets에서 웹 페이지 로딩하기
        webView.loadUrl("file:///android_asset/index.html");

        button.setOnClickListener(new View.OnClickListener() {

            @Override
            public void onClick(View v) {
                Log.d(TAG, "onClick(" + v + ")");

                // 자바스크립트 호출
                webView.loadUrl("javascript:callJS('Hello from Android')");
            }
        });
    }


    /**
     * 자바 스크립트에 노출된 객체
     *
     */
    private class AndroidBridge {
        public void callAndroid(final String arg) { // 반드시 final이어야 함

            handler.post(new Runnable() {

                @Override
                public void run() {
                    Log.d(TAG, "callAndroid(" + arg + ")");

                    textView.setText(arg);
                }
            });
        }
    }
}

WebView쪽
<html>
<head>
<script type="text/javascript">
    function callJS(arg) {
        document.getElementById("replaceme").innerHTML = arg;
    }
</script>
</head>
<body>
<h1>WebView</h1>
<p>
    <a href="#" onclick="window.alert('Alert from JavaScript');">Display JavaScript alert</a>
</p>
<p>
    <a href="#" onclick="window.andriod.callAndroid('Hello from Browser');"></a>
</p>
<p id="replaceme"></p>
</body>
</html>

addJavascriptInterface() 에서 설정한 DOM명칭 "android"로 WebView에서 호출가능하다.

- final 매개변수를 잘 사용하자. -> 메소드 내에서 변경하면 안되는 값(주소값)일 경우에 사용하면 유용할 듯

[Hello,World] Sudoku

프로그래밍/Android 2010. 8. 31. 00:01 Posted by galad
스도쿠 예제

Menu Activity

         I : 메뉴선택

Game Activity -> PuzzleView : 그래픽 처리
(게임 로직 처리)